Following on from the Enquiries Tile we then move onto the tile which holds Internal tasks. In this tile there is a mix of different functions from movements to stock counts.
Movements (Ad Hoc)
The first tile you will see is the Movements tile, these are Ad-hoc movements which mirror that of the Item Reclass Journal or Warehouse Item Reclass Journal (depending on your location setup) within Microsoft Dynamics 365 Business Central.
Click on the Movements tile you will be prompted to enter the Bin Code, this is the bin code that the item they want to move is currently in.
You will notice that the Location Code and the New Location Code has already been populated. The Location Code is based on the location you are currently logged onto the device as. If you click on that field the device will pop up a message.
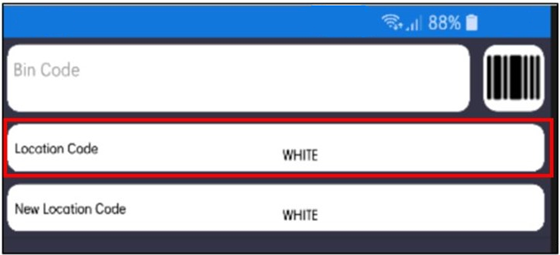
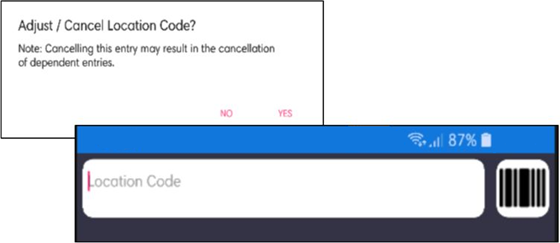
Clicking Yes will then ask you to scan in the new location that you will be carry out your movement in, saying No you will take you back to the previous screen.
You also have the option to change the New Location Code, just like before you click on the field and say yes or no as to whether you want to adjust it.
NB: If the New Location Code is a Directed Pick and Put-away location you won’t be able to adjust the new location code field without changing the location code field first. You can’t move stock from a basic location to an advanced location
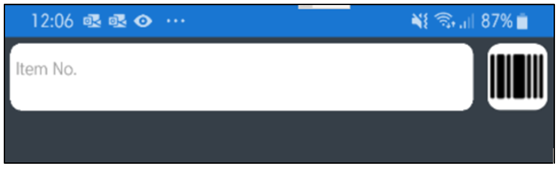
Once the Bin Code is entered, you will then be prompter for the Item No, following this they will need to enter the quantity you want to move, this can be the entire bin quantity or just part of it.

From here, they will need to enter the New Bin Code that they wish to move the items to. If this bin has the available capacity, it will allow the user to post.
If you Adjusted the LocationCode at the beginning, then after the quantity you will be prompted to enter the New Location Code, before posting the movement.
NB: If the items you are moving are Lot or Serial tracked or have a Variant against them, you may be prompted for these details if not held within the item barcode that you scanned at the beginning.
Directed Movements
Directed Movements are typically planned movements created for replenishment purposes. They can only be used where the location is setup for Directed Pick & Put-Away. The movement is created in Microsoft Dynamics 365 Business Central, then distributed to the warehouse employees where they are actioned on the device.
Once the warehouse movement has been created it is then for the warehouse employees to carry them out. Clicking on the Dir. Movement tile will prompt the user to first choose whether to action a specific movement or not.
If you select Yes, then you will be prompted by the device to scan in the movement number you are working on, if you select No, you will be presented either with the next movement in the Warehouse Movement List in Microsoft Dynamics 365 Business Central not being worked on, by another user . Or you will be presented with a movement that has been assigned to you by your warehouse manager.
NB: Movements are assigned to Device Users in Microsoft Dynamics 365 Business Central.
On entering a movement, you will then be prompted to select which item within the movement you want to action first.
You can click on the additional information button to view further information regarding the movement line. Including: The Bin it is currently in and the Quantity that needs moving.

NB: This is based on a field on the Clever WMS Devices Setup page called Move/Pick Line Sel. by Lookup
Selecting your item will then prompt you for the Bin code, this is the Expt’d Bin, where you are moving the item from. This is visible on the device screen., you can decide to take the stock from another bin (providing that bin has enough quantity the movement will register)

Follow through the remaining prompts required, you will be asked to enter the quantity you wish to move, this can be all or part of the bin. This will the lead to the device asking you which bin you want to move the item to, you will need to enter the Place Bin Code in here, on the device the suggested place bin is visible next to the field Expt’d Place.

Once all the data has been validated against Microsoft Dynamics 365 Business Central the movement line will automatically register.
Physical Inventory Journals (Stock Take)
The next two buttons relate to doing a stock count. Phys.Inv and Req. Phys. Inv. The stock take can be run a number of ways and as often as you need it to.

How to use either of these functions is explained in a separate section of the user guide.
Bin Block
The next tile along if the Bin Block. This function allows you to block bins from being used during certain movements. You have the option to block bins for Outbound process, Inbound process or All processes.
Clicking on the tile will prompt you to enter the Bin Code you wish to block. On entering the bin, you will be able to see the bins current status, detailed in the field Block Movement.

To choose the level of block you want to give the bin you need to click on the Options button at the bottom of the device.

On selecting the level, you want to block the bin at you will see on the screen how the block movement field has now changed its status to show what you have selected. Click on the Post button to compete the process.
Item Cross References
The next tile along is the Item Cross Reference function. Using Item Cross Reference allows you to quickly identify the items that you are purchasing from a vendor based on item numbers other than your own. This can also apply to situations where a part has a new barcode that your Microsoft Dynamics 365 Business Central won’t recognize when scanned using one of the other functions
As soon as you click the Item Cross reference tile it will prompt you to enter the Item No you want to create the cross reference for. On entering the item no the device will show details relating to that item number. You will then be promoted to enter the Cross-Reference No.
Once you have checked the details on screen click Post to complete the function. This will then be visible as a cross references against the item in Microsoft Dynamics 365 Business Central, cross reference type Barcode.

You will have noticed that on the device there was an Options button. Clicking on that button will give the option to Discontinue Barcode, whether that is in relation to a new cross reference you are creating or an old cross reference you have already against the item.
Item Photo

The final function that is part of the standard configuration is the Item Photo function. This function allows user to take pictures of items in their warehouse which will then be pulled back to the item card in Microsoft Dynamics 365 Business Central.
Clicking on the function will you then prompt you to enter or scan in the item no that you are going to be taking a picture of.
On entering the item number, you will then be taken straight to your device camera or the button Photo will be visible at the bottom of the screen.
Once the picture is taken, click on the OK action, before clicking Post.

Clicking on the post action will then show this photo against the Item number you scanned at the beginning. You can find this photo on the item card in the Photo Fact box.

Item Attributes

Outside of the Standard default configuration setup there are two further functions that can be added to the internal tile. The first is the Item Attr this function allows users to see the items Attributes.
Clicking on the function, you will be prompted for the Item No, on entering that you will be presented with a list of attributes.
NB: The attributes aren’t specific to the item these are all the attribute codes you have created in Microsoft Dynamics 365 Business Central

Although the codes aren’t specific to the Item the value applied to each attribute code will be.
Within this screen you can also change any of the values already applied to attributes or add values to those which don’t have any. To do this click on the attribute where you want to add a value or change one which has a value and simply type in the new value when prompted.

NB: On the device you will see a field called Value, this relates to the data already held against that record.
Attributes which are a type option (those attributes setup so you can choose from a list of values) will be presented with a list of options to change to, rather than being prompted to type in a value.

Substitutions
The second of the extra functions is Substitution. This function allows you to create item substitutions. Substitutions are used when the preferred item is not available. When you click on the tile on the device you will be prompted to enter the Item No. you will then be prompted to enter the items substitution (Substitute No)so if your orginal item is not available what could be offered up instead.

Once you are happy with all the details displayed on the screen, click the Post button. This will update against the item in Microsoft Dynamics 365 Business Central. Meaning that if this item is not available for Sales to a customer, the substitution you have just created will be offered up instead as an alternative item.
Container Consolidation
The ‘Container Consolidation’ Function can be used if you are also using the ‘Clever Container’ App. It provides the ability to be able to merge together the entire contents of one Container into another one via your Handheld device.
In addition to merging two Containers together, you can also use the ‘Container Consolidation’ Function to move the entire contents of one Container into a new Container if required.
The ‘Container Consolidation’ Function is located under the ‘Internal’ menu on your Handheld device.

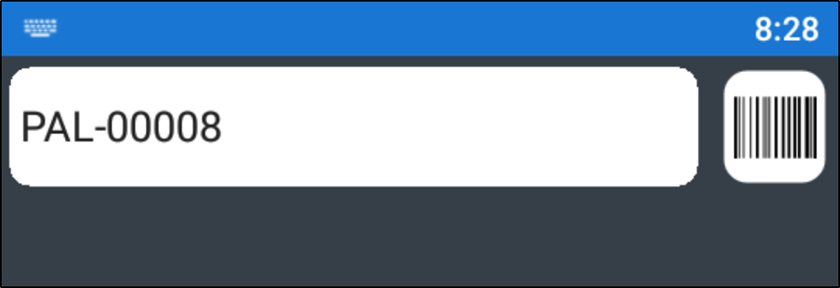
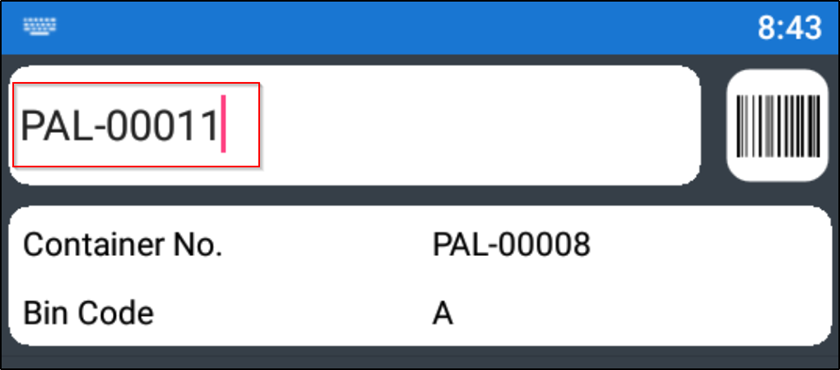
In this example, we will merge container numbers ‘PAL-00008’ and ‘PAL-00011’ together.


When you select the ‘Container Consolidation’ option on the Handheld device, enter the ‘Container No’ of the Container you want to move the contents from.
On the next Page, you will see a list of all the different ‘Container Types’ you have created. You should select the type you want to use.

| Note – The ‘Container Type’ selected here will only be used if you are moving the Container contents into a new Container. If you are moving the Container contents into an existing Container, then this selection will be ignored as the existing Container will already have a type defined. |
|---|
On the next Page, in the ‘To Container No.’ field, you will need to select the Container that you want to put the items into. The field will automatically default to “(AUTO ASSIGN)” which means that a new Container will be created with the ‘Container Type’ you selected on the previous Page.

If you would like to move the contents of the selected Container into an existing Container, then you can click on the ‘To Container No.’ field and change it. If you do that, then the below message will appear:

If you click on the ‘Yes’ button, then the below Page will appear allowing you to enter in the required ‘Container No.’.
The ‘Container Movement’ can then be posted.
Once completed, the ‘Container’ and associated ‘Container Entries’ will be automatically updated within Business Central.


| Note – The ‘Container No’ field is also recorded against ‘Warehouse Entries’ when they are created but the value will not be updated when using the ‘Container Consolidation’ Function. |
|---|
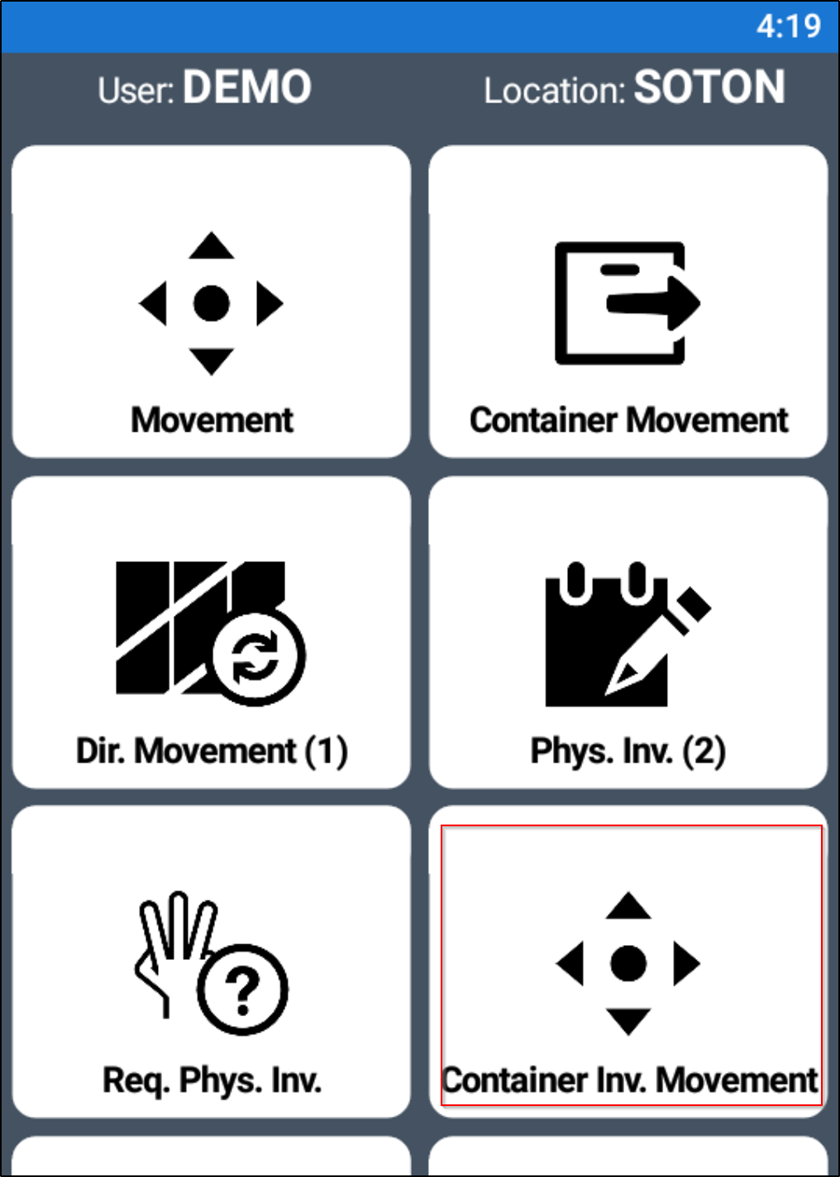
Container Inventory Movement
The ‘Container Inventory Movement’ Function can be used if you are also using the ‘Clever Container’ App. It provides the ability to be able to move items from one Container and put them into another one. You can choose to move either the full item quantity available in the Container or a partial quantity.
The ‘Container Movement’ Function is located under the ‘Internal’ menu on your Handheld device.
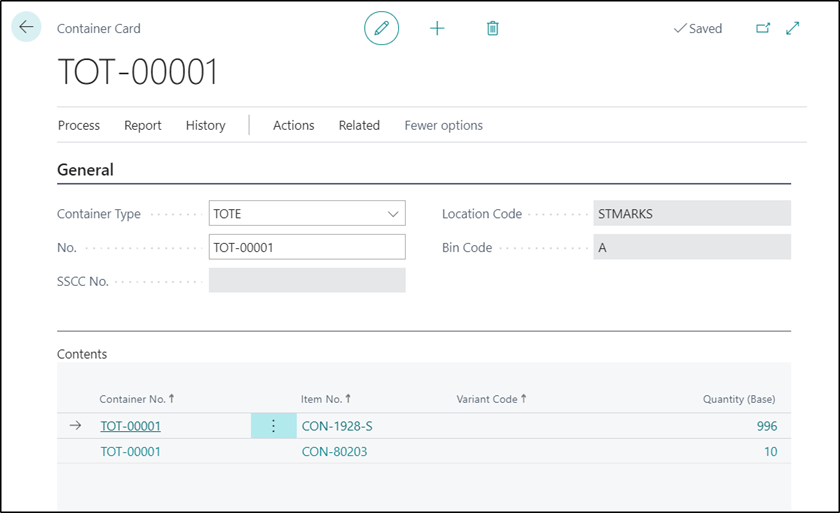
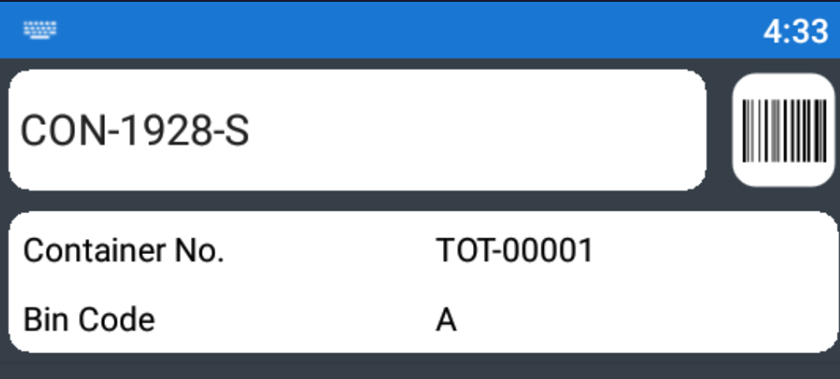
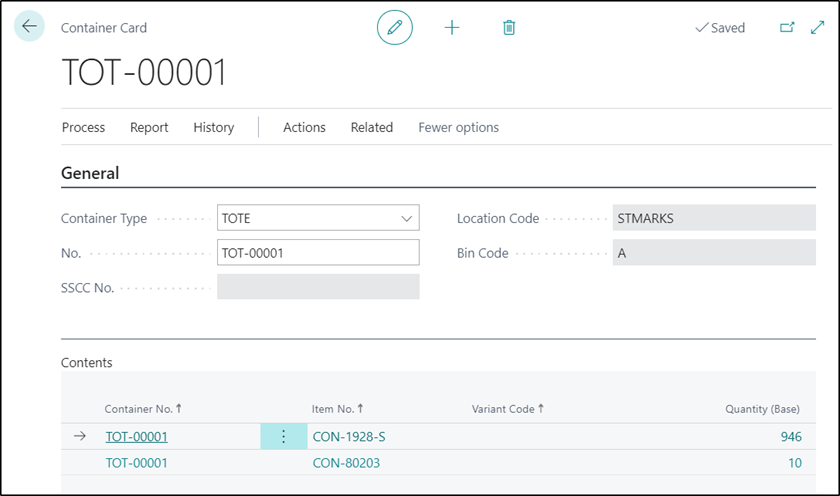
In this example, we would like to move 50 x item number “CON-1928-S” from Container “TOT-00001” into Container “TOT-00031”.

When you select the ‘Container Inventory Movement’ Function on the Handheld device, enter in the ‘Container No’ of the Container you want to move the items from.
On the next Page, enter in the quantity of the item that you would like to move between Containers.

On the next Page, you will need to select which ‘Type’ of Container from the list displayed you would like to move the items into.
There are two options available for the ‘Type’ of Container selected, either automatic or manual number assignment.
Automatic – The number of the Container will be automatically assigned based on the number series defined against the ‘Container Type’. With this option, the next Page displayed will be the ‘Post’ Page.
Manual - If you already know the Container number that you want to move the selected items into, as per the example we are using, then you will need to select a Container ‘Type’ which has been setup to allow for manual numbering.

If you have selected a Container ‘Type’ which has been setup with manual numbering, on the next Page, you will need to enter in the number of the Container that you want to move the items into.

In either the manual or automatic numbering scenario, when the ‘Post’ button is displayed, it should be selected in order to post the ‘Container Inventory Movement’.
Once complete, the ‘Containers’ in Business Central will be updated with the movement detail along with the associated ‘Container Entries’.


|
Note – The ‘Container No’ field is also recorded against ‘Warehouse Entries’ when they are created but the value will not be updated when using the ‘Container Inventory Movement’ Function. |
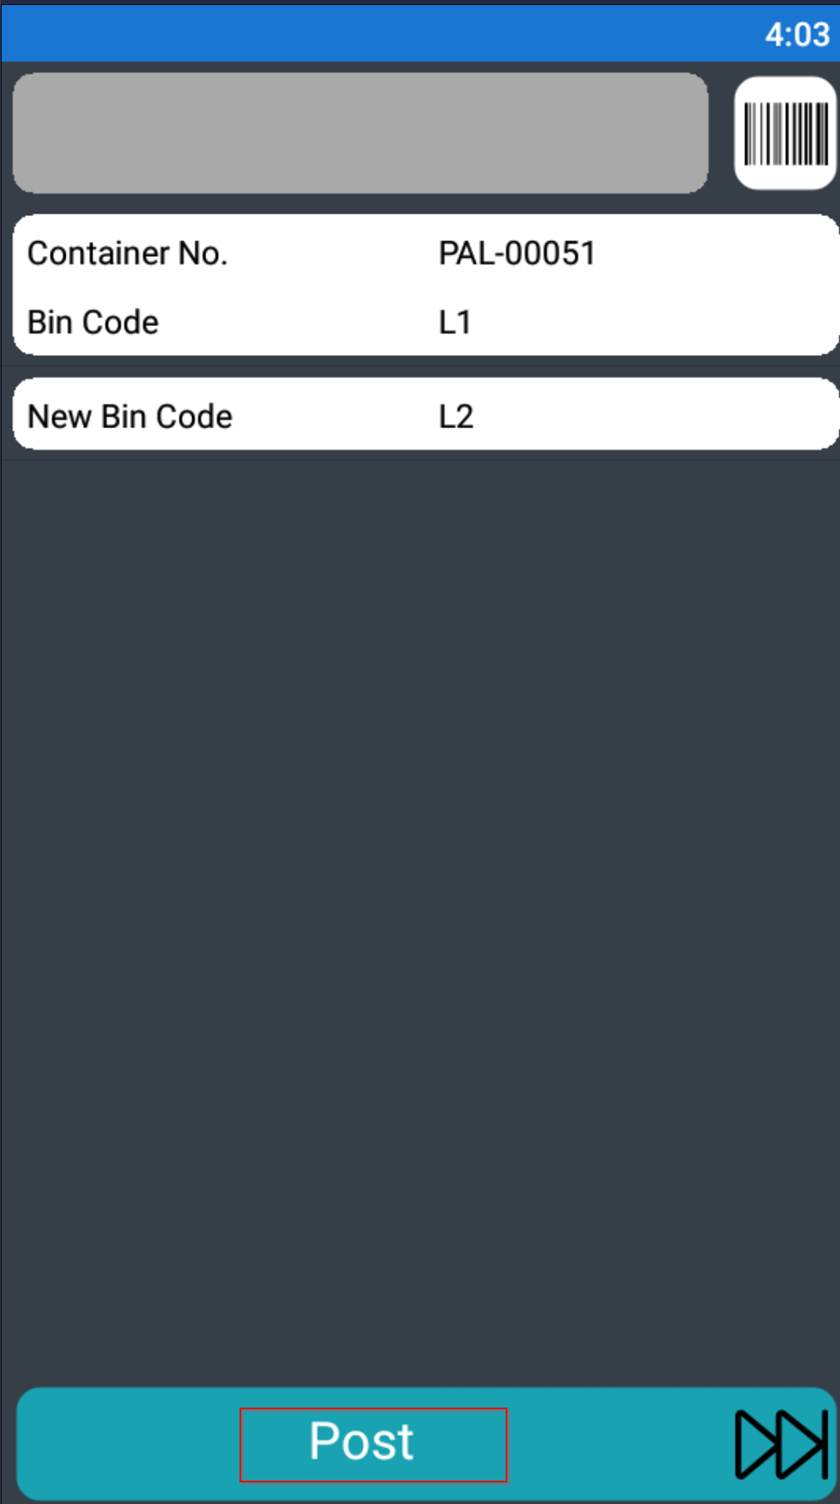
Container Movement
The ‘Container Movement’ Function can be used if you are also using the ‘Clever Container’ App. It provides the ability to be able to move a whole Container and all its contents from one Bin and place them into another Bin.
The ‘Container Movement’ Function is located under the ‘Internal’ menu on your Handheld device.

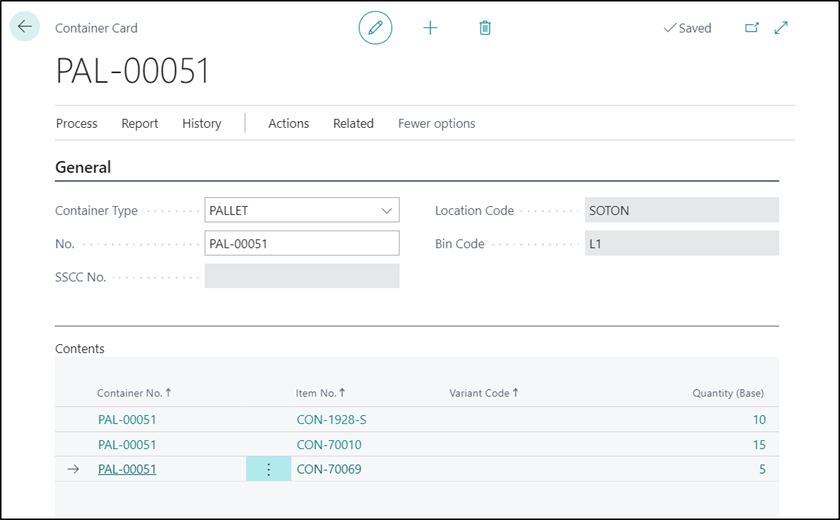
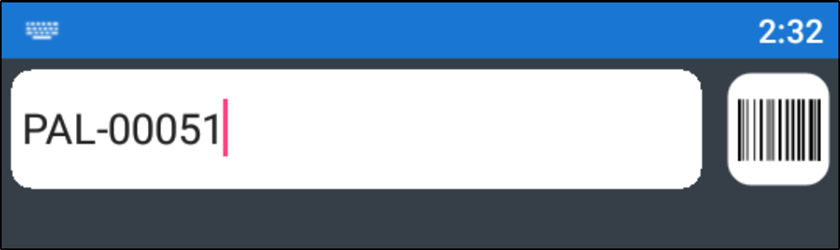
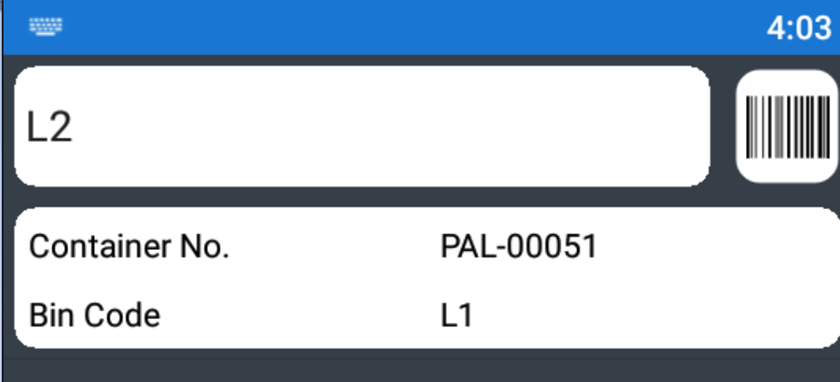
In this example, we will move Container ‘PAL-00051’ from Bin “L1” into Bin “L2”.
When you select the ‘Container Movement’ Function on the Handheld device, you will firstly need to enter in the ‘Container No’ for the Container you want to move to a new Bin.
On the next Page, you then need to define the ‘New Bin Code’.
On the following Page, click the ‘Post’ Button in order to complete the movement.
Once complete, the ‘Container’ in Business Central will be updated with the new ‘Bin Code’ value and related ‘Container Entries’ and ‘Warehouse Entries’ will also have been created.


