To make the most of Clever WMS Plus it is important to lay out and label bins in an efficient manner. Clever WMS Plus introduces the concept of racks to the existing warehouse storage types in Microsoft Dynamics 365 Business Central. Racks are a new construct that help to organise bins and provide a notion of the physical location of a bin within a warehouse. Racks can be thought of as large sections of shelving units that store your products. Depending on the warehouse, racks might be considered as an entire shelving unit spanning one side of an aisle, or as small sections within a long unit of shelving. A rack logically sits between a location and a bin in a basic warehouse scenario, and between a zone and a bin if using directed put-away and pick. Racks are optional in both cases.
To differentiate between a bin that is part of a rack and those which are freestanding, Clever WMS Plus also introduces the concept of a floor bin. Floor bins are simply bins that are not part of a rack.
By using racks and floor bins, Clever WMS Plus can improve efficiency in the way warehouse employees are routed around the warehouse. Having an optimised warehouse layout means your employees spend less time finding products and make fewer mistakes.
To utilise racks fully, they should be considered when designing the format of a bin code. A rack bin is in effect a position within a bin, and can be identified as the rack number, the section of the rack, and the level (shelf) of the rack. If the rack contains specialised storage mechanisms such as small parts bins or roller racking, this can be further divided by having additional sections and levels within the bin. This concept is illustrated in the diagram below:
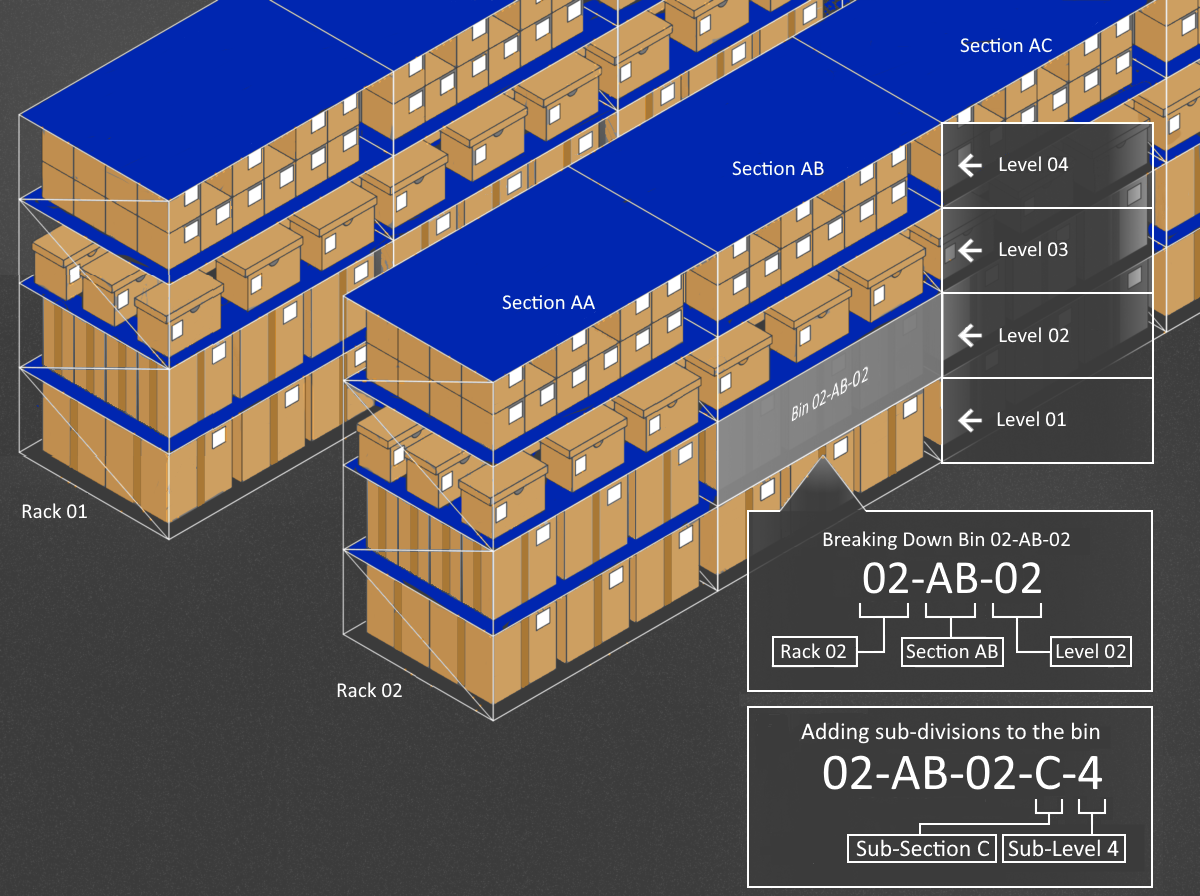
Note: Depending on the format of the racking it may be more optimum to switch the order of Level and Section.
For floor bins, it is not necessary to identify a position in a rack as they are freestanding, although it is good practice to prefix these with an identifier that clearly differentiates them from a rack bin.
Within Clever WMS Plus, the rules that govern the format of bin codes are managed by Bin Code Formats. When deciding on the structure of bin codes, the following best practice suggestions should be considered:
Bin codes should be easily identified both by barcode and as a human-readable code. Make the format consistent and meaningful.
When setting up numeric codes, add leading padding of 0 to ensure codes are always the same length. For non-numeric codes, choose a consistent, suitable character to pad codes to a standard length.
Choose a length of code that allows sufficient scope for future expansion of the warehouse.
Number levels from the ground up. This way, if you add more levels, you don’t have to relabel your shelves.
Consider leaving gaps in the series to allow for future warehouse reorganisation.
Consider alternating the sections of the code between numeric and alphabetical. This can help minimise human reading errors.
A common method of labelling racks is to use the serpentine method. Using this method, adjacent racks are numbered in the opposite direction to the preceding rack. This allows warehouse employees to weave (like a snake) up one aisle and down the next, reducing the distance travelled when picking multiple items.
With Clever WMS Plus, this method is not necessary. Put-away and pick routes can be used to define the order that bins are visited, rather than encoding this logic into the bin format. This means the consistency of bin formats does not need to be compromised to support efficient warehouse operations.