The "Rebate Setup" page, accessible from the search bar, is the main page to define the default data the rebates need in order to accrue, generate output documents and post in the background, so when these are populated once, you should never need to change them. All of the fields need to be populated for what you are using, i.e. if you are using this for Sales only, populate all of the Sales fields only. If you are using Purchase rebates only, populate all of the Purchase fields only. If using both, ensure all fields are populated.
In the ribbon you can use the Assisted Setup to assist with the population of fields on the "Rebate Setup" page. You can find more information on how to use these features in the next 2 articles starting here. Below are instructions on how to populate the fields manually.
The Rebate Nos. field needs to be populated with the "No. Series" you just have created for the Sales and Purchase rebates. You can click on the drop-down arrow within the field to bring out a list of the existing ones to choose from.
The Sales/Purchase Notification Recipients field can be populated with the User email address that will receive an email notification if the Auto Post Output Document fails. This includes instances where Ext. Doc No Mandatory is 'Yes' on either the "Sales & Receivables Setup" or "Purchases & Payables Setup" which requires that field to be populated on the output document before it can be posted so Auto-posting will not work in that instance. This also includes where you are choosing 'Purchase Invoice' as your document output for Sales Rebates but have not connected a Vendor to your Customer, the email address stated in the Notification recipient field will be emailed.
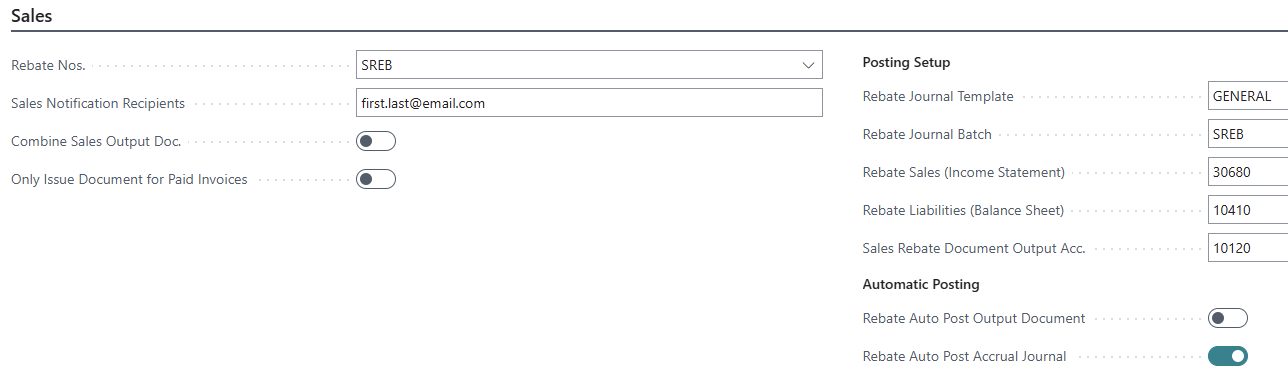
Currently, where more than 1 Rebate exists for a Customer/Vendor and the Document Output is issued, multiple will be created (1 per rebate card). If you wish to combine all of the rebates from multiple cards into 1 output document, change the Combine Sales/Purchase Output Doc to 'Yes' which will merge all rebates into 1 credit memo or Purchase invoice.
Only applicable for sales rebates, the Only Issue Document for Paid Invoices toggle is defaulted to 'No' and means all non-issued Sales rebate entry will be used to calculate the rebate value when creating the document output. Switching this 'On' will only use rebate entries that have been paid by your Customers when calculating how much rebate value to include on your document outputs, assisting in minimising risk to your business by ensuring any money being paid out to your customers is based on money that has been received, so you're not paying money out for Invoices that have been posted but have not yet been paid for.
The next field required is the Rebate Journal Template field. This defines what journal template you want Business Central to use when creating the accrual journal. It is usually best practice here to use the 'GENERAL' template and define a new Journal Batch to use on the next field, however if it works best for you to create a new Template, this is also acceptable.
With the Rebate Journal Template specified, the Rebate Journal Batch can be populated. As mentioned above, it is wise here to create a new batch so that your accrual journals will only ever populate journals specifically for rebates, which minimises the risk of other users accidentally posting or amending the rebate journal entries. To do this, click on the drop-down arrow on the field and select 'NEW'.
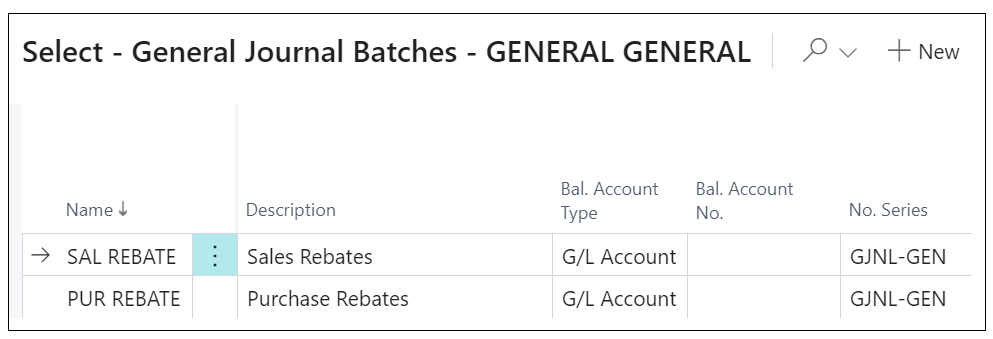
It will open up a screen similar to the above, where you can edit a new line, assign it a Name and Description. You can allow the Bal. Account Type to default to 'G/L Account' as this setup will be populated on the "Rebate Setup" page more specifically.
The next field required is the Rebate Sales/Purchase (Income Statement). This is the G/L account into which the Rebate Accrual will be posted. Then, populate the Rebate Liabilities/Assets (Balance Sheet) with the G/L account you want to post the balancing amount to. We’d expect this GL to sit within your "Chart of Accounts" in the 'Balance Sheet'. Setting the above two accrual fields up means that when you come to create your Accrual Journals from the rebates, Business Central will create the journal lines using these accounts. These same accounts are then used in the Reversal process as opposing entries. The fields here are used by default on Sales & Purchase rebates however, you can use alternative ones per Rebate Card as outlined here.
After this, populate the Rebate Document Output Acc. field with the G/L account you want the Document Output to post to ('Sales Credit' or 'Purchase Invoice' for Sales rebates or 'Purchase Credit 'for Purchase rebates). The document will generate as a G/L line with this specified number along with pulling the rebate data within. This is covered in more detail in the Menu within the headers Automatic Document Posting and Create Document Output . The G/L Account selected here must be one that is setup to accept Direct Posting as 'True' in your "Chart of Accounts" which means it must therefore be a different G/L Account to the Accrual ones used, at least where Auto Post Accrual Journal is 'Yes'.
In relation to Automatic Posting, there is a tick option to confirm if the Rebate Auto Post Output Document is required. Leaving this unticked will mean that posting these remains a manual process. If this is ticked as 'Yes', the output documents automatically get created and posted. If any fail to post and the Notification Recipient field is blank, no email will be sent advising a user which documents haven't posted so it is beneficial to populate that field with an email address.
Finally, there is a Rebate Auto Post Accrual Journal toggle. If this is ticked, you can batch post accrual journal postings. If unticked as 'No', the Journal entries will be created and require manual posting. Where 'Yes', the Accrual Posting Setup G/L Accounts used can be 'False' for Direct Posting on the "G/L Account" card. This is because the accrual journals that are posted automatically are classed as System created entries. For more information on these, check out the Automatic Accrual Posting and Create Accrual Journal menu headings.
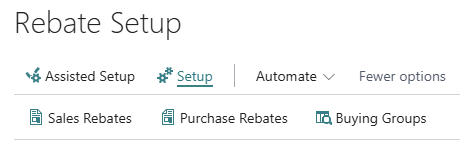
Ribbon
As well as the Assisted Setup, you can access both the sales and purchase rebates list from the Actions button, clicking into Setup and then selecting either the "Sales Rebates" or "Purchase Rebates" which will open up a list of the ones already created. You can also access the Buying Groups table from here. More information on how to use the Buying Groups can be found here.