The easiest way to create a new record in the Route Status List is to run the Create Status List Function from the Ribbon.

Selecting the option will open a Wizard that will guide you through the configuration by asking a series of questions on how you run your shipping operations. Based on the answers you provide, the application will automatically create the required Route Status information.
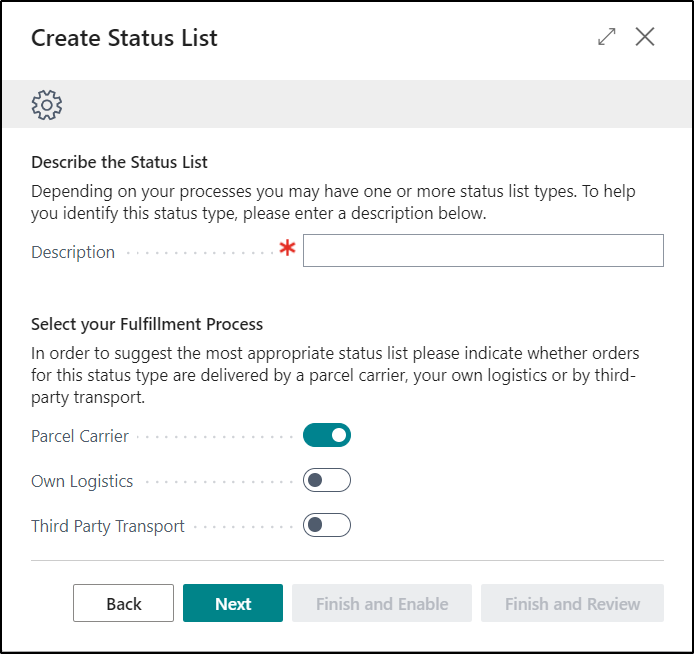
When running the Wizard, you will be presented with three different options to select from for the Fulfilment Process. These are Parcel Carrier, Own Logistics and Third Party Transport. Depending on the option selected, different Route Statuses maybe automatically populated into the Route Status List.
If you need to create more than one record i.e. for different Locations or Shipping Agents etc., then the Wizard can be run multiple times.
In addition to using the Wizard, you also have the option of being able to create a new record by copying an existing one. This can be completed by selecting the Copy Status List Function on the Ribbon.

General
The Fields available on the General Tab allow you to define which Location, Shipping Agent and Shipping Agent Service is applicable to that Route Status List as well as being able to Enable or Disable the record as required. If you want to make any changes to the Route Status List then the record will need to be Disabled first.

Status Line
If you wish to make any changes to the Route Status List after it has been created, this can be done from the Route Status List Card.
Note: a Route Status can only be updated when not Enabled
You can Add or Remove a Status Line from the Route Status by utilising the options shown below.

If you need to change the Sequence of the different processes that are part of the Route Status then this can be done by using the following options.

In addition to the above, if you want to understand more about the purpose of a Status, then you can select the relevant line and then choose the Status Information option. This will then provide more information about what that Status is used for. Alternatively you can also review the Status Types section of this guide.

The additional Fields on the Status Lines Tab allow you to further control on how a Route is processed:
| Process Automatically |
If you Enable this option against a Status, then you will not have to manually process the Status from the Shipment Management Routes Page and it will be automatically processed once the preceding Status has been completed. Regardless of this setting, certain Status Types are also integrated with Warehouse Documents or Clever WMS Devices. In these cases the Status will be automatically moved to the next status. For example, the Register Picks Status will be automatically completed once the last Pick relating to the Route is processed by registering the Warehouse Pick directly against the Warehouse Pick document or via Clever WMS Devices. |
| Hide Status |
Enabling this Field will mean that the Status will be hidden from the Factbox on the Shipment Management Routes Page. Status lines are also automatically hidden if they are not relevant to the Route. For example, the Create Receipts Status will be automatically hidden and not processed if there are no collections on the Route. |
| Show Summary |
This option can be Enabled if you want to display to the User a Summary of what has happened after that Status has been processed on a Route. For example, how many documents have been processed etc. This option is not applicable to all Status Types and has only been implemented against Statuses where it is relevant and the summary information can be displayed. |
| Allow Add or Move Entries/Drops |
If you Enable this option it will allow you to define, if a Route is currently at this Status, if users can add new Drops or move existing Drops onto a new or existing Route. This is useful to limit when you don't want to make changes to a Route that could lead to operational issues occurring. E.g. if you are at the Create Pick Status point you would probably not want to add or remove a Drop, so as to ensure that the Warehouse Operatives have been issued the complete list of Items required to fulfil the Route, as a modification from at this point could cause issues with missing Picks and short shipping Customers. If a Route is at a Status where this option is not Enabled, then you will receive an error stating it cannot be added or moved. Note: This restriction applies to moving drops within a route as well as moving to a different existing or new route. |
| Allow Cancelling Reservations |
This Field should be used to determine whether or not a Reservation for a Shipment Management Entry can be Cancelled when a Route is at that Status. Please also refer to the Reserving Items for a Route Page for more information. |
| Prevent Processing from Route |
If you select this option, then it will not be possible to process the Status directly from the Shipment Management Route Page. This is useful for Statuses such as Picking when you need the Warehouse Operatives to process the Picks and the Status to only be updated once Picking is complete to ensure all the items have actually been Picked and are available in Ship. In this scenario, they would either have to process the Picks directly from the Warehouse Document or via Clever WMS Devices and a handheld device etc. |
| Manage Failed Deliveries |
If you Enable this Field against a Status, then you will be able process any required action relating to deliveries that could not be completed. Generally this would only apply to Statuses which come after Warehouse Shipments have been posted and prior to making any receipts as the result of a collection. The most likely Status Type to use for handling your failed deliveries would be the Title Only Status as this does not have any functional purpose but just allows you to add in an additional stage before completing a Route to prompt Users to check for delivery failures. More information about how to process any failed deliveries can be found here Handling Failed Deliveries |
| Error Policy |
This Field is used to determine what happens if an error occurs during processing of a Status. The options to select from are: Status Errors are Not Processed - If you select this option, then the system will automatically move onto the next status (if specified) even if there was an issue with processing. This might be useful, for example, if you have Picks for a large number items and there is an error picking one item. In this scenario you may not want to hold up processing of the rest of the Route whilst the error is resolved. Stop and Show Errors - If you select this option, then the processing of the Route will be stopped to allow the error to be resolved. |
Assignment
The Route Assignment Field allows Users to be able to define the point that a Source Document Line should be added to a Route. This could either be on the Source Line Entry or Source Document Release.

Reservations
The Fields available under the Reservations Heading allows you to be able to control if the lines from the source documents can be included on the Route based on their Reservation Status.
This can be utilised in scenarios where you may only want to Ship an order if all items are available to Ship at the same time i.e. if you are shipping a bathroom suite consisting of a toilet, sink and bath and do not want to Ship anything unless all items can be shipped together.
This functionality can also work in conjunction with the standard Business Central Shipping Advice Field on the Customer Card which controls whether or not they accept only Complete or Partial Shipments.

Defining Report Selections
If you are using the new Print Documentation Status, then you can define under the Report Selections Menu Option the report(s) you want to run. See also Integration with Clever Document Delivery.
