When you receive an Invoice for a Landed Cost you should register the costs through a "Purchase Invoice" within Dynamics 365 Business Central.
As part of Clever Landed Costs some additional functionality has been created to allow you to assign the Landed Cost(s) on the invoice to the "Posted Purchase Receipt" (or posted Transfer Receipt) that it applies to, as detailed below.
Note: from Version 5.0.0 of Clever Landed Costs it is possible to speed up the processing of a Landed Cost Invoice using the Create Landed Cost Invoice wizard, as detailed in Purchase Invoice Wizard. Alternatively, read on for full details of how to manually complete the invoicing process.
Creating the Purchase Invoice
Create your "Purchase Invoice" for the Vendor as you would do for any other type of "Purchase Invoice" you need to process and then select the required Landed Cost Type Code on the Lines section of the Invoice. If you have a multi-line Invoice you can repeat this step as required so that your "Purchase Invoice" within Business Central mirrors the document you have received from your Vendor.
When you select a Landed Cost Type Code the line is completed for you:
-
the Type is set to G/L Account
-
the No. is set to the Accrual Account of the Landed Cost Type when its Cost Treatment is Default, or to the Purch. Account from the "General Posting Setup" for the Landed Cost Type's Gen. Bus. Posting Group and the Charge Item's Gen. Prod. Posting Group when its Cost Treatment is Charge Item
-
the Quantity is set to 1
-
any default dimensions set up for the Landed Cost Type are added to the line
For each Invoice line, enter the Direct Unit Cost Excl. VAT from the Invoice. This is the total value of that Landed Cost on the Vendor's Invoice.
Note: a Landed Cost line must always have a Quantity of 1, and its No. must stay as the account set from the Landed Cost Type. If you change the Landed Cost Type Code on a line, any Landed Cost assignments already made for that line are deleted.
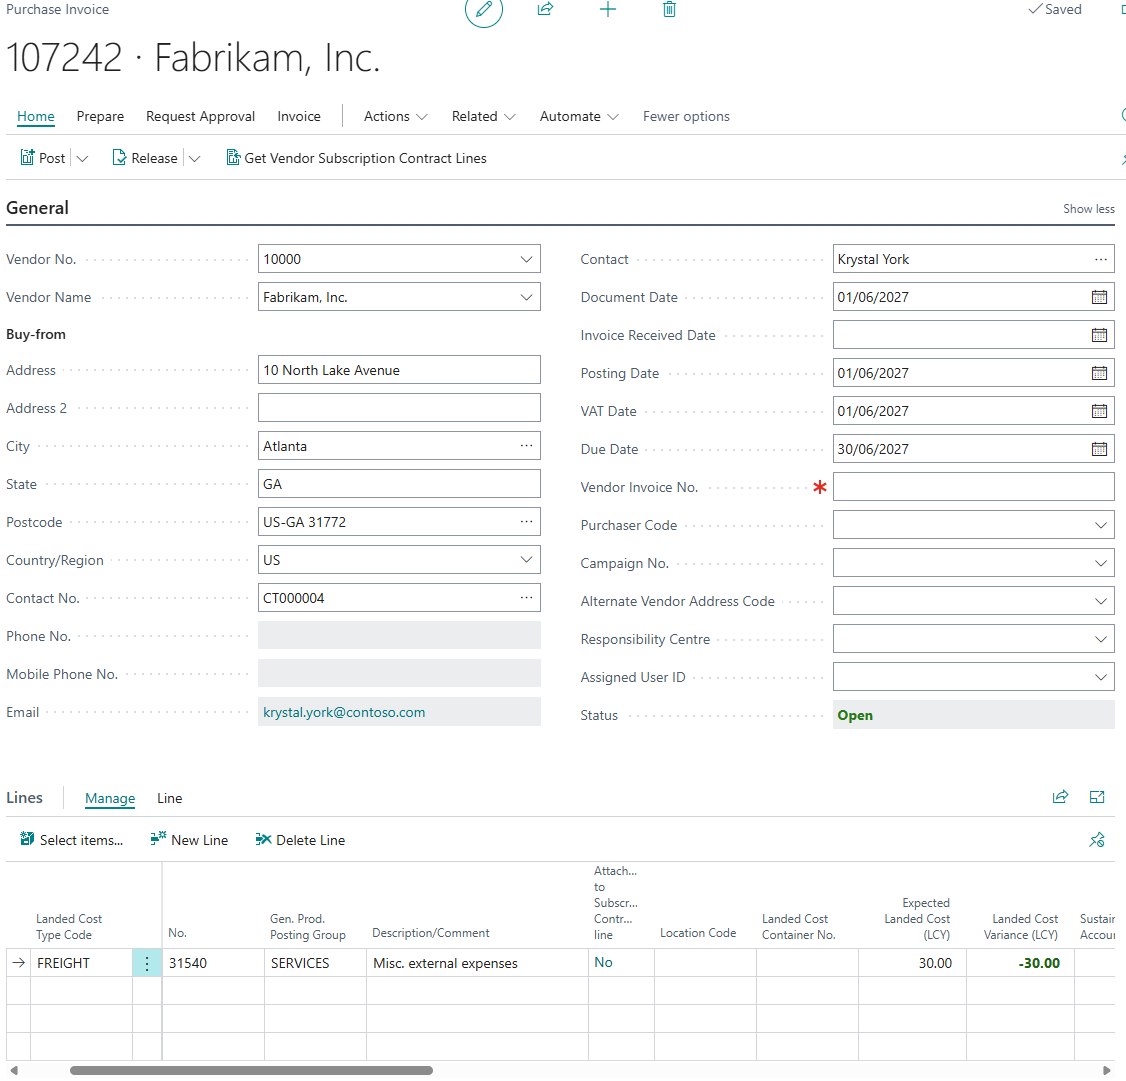
The following Clever Landed Costs fields are available on the Lines section of the "Purchase Invoice".
| Landed Cost Type Code | The Landed Cost Type that this Invoice line is for. This is the first column on the lines. |
| Landed Cost Container No. | Optionally enter the Landed Cost Container that the Invoice line relates to. When a container is entered, Get Entries only shows receipt entries for that container. You cannot change this field to a different container once the line has been assigned to entries for another container. |
| Landed Cost Job No. | The Job No. of the Landed Cost Container. This field is hidden by default and can be added using Personalise. |
| Source PO No. | Shows the Source Document (Purchase Order) number of the first entry assigned to this line. This field is hidden by default and can be added using Personalise. |
| Expected Landed Cost (LCY) | Shows the expected Landed Cost for this line, based on the cost assignments made for the line. |
| Landed Cost Variance (LCY) | Shows the variance (Actual - Expected) for this line. A positive value means the line is over-invoiced and is shown in red. A zero or negative value means the line is under-invoiced (or matches) and is shown in green. |
The Totals section of the "Purchase Invoice" also shows an Expected Landed Cost (LCY) and a Landed Cost Variance (LCY) total for all of the Landed Cost lines on the Invoice, using the same colours.

Assigning the Invoice Lines to Receipts
With all of the information entered onto the Invoice, the next step is to assign the Landed Cost Invoice lines to the related Purchase Receipts and related "Item Ledger Entries".
To do this select the Invoice line and choose Line > Related Information > Landed Cost Assignment. This opens the "LC Cost Assignment" screen for that line.
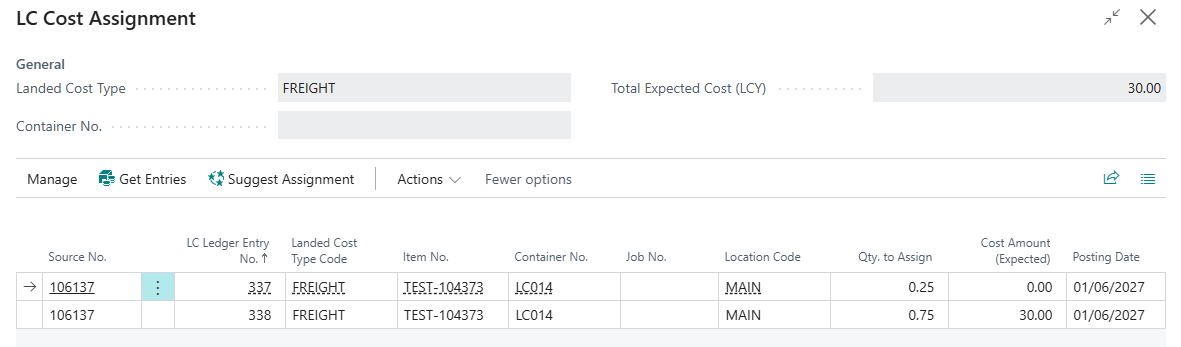
The following fields are available on the "LC Cost Assignment" screen.
General
| Landed Cost Type | The Landed Cost Type Code of the Invoice line. Only entries for this Landed Cost Type can be assigned. |
| Container No. | The Landed Cost Container No. of the Invoice line, if one has been entered. |
| Total Expected Cost (LCY) | Shows the total expected cost for all of the assignments on this line. |
Lines
| Source No. | The Purchase Order (or Transfer Order) number that the Landed Cost entry came from. |
| LC Ledger Entry No. | The receipt "LC Ledger Entry" that the Invoice line is being assigned to. |
| Landed Cost Type Code | The Landed Cost Type of the entry. |
| Item No. | The Item that was received. |
| Container No. | The Landed Cost Container of the entry. |
| Job No. | The Landed Cost Job No. of the entry. |
| Location Code | The Location the Item was received into. |
| Qty. to Assign | The proportion of the Invoice line cost to assign to this entry, for example 0.25 for a quarter of the cost. The values for all lines must add up to exactly 1 before the Invoice can be posted. You can enter these values yourself or use Suggest Assignment. |
| Cost Amount (Expected) | The expected (accrued) Landed Cost of the entry that is still open. This is 0 for entries that have already been invoiced (closed). |
| Posting Date | The posting date of the receipt entry. |
The Source Type, Source Subtype, Source Line No., Document Type, Document No., Document Line No. (of the posted receipt) and Item Ledger Entry No. fields are hidden by default and can be added using Personalise.
Getting the Receipt Entries
On the "LC Cost Assignment" screen select Get Entries (from the Process menu, or Actions > Functions) to select the Inventory Receipts that you wish to allocate against the Invoice Line. This opens the "LC Item Ledg Entry Cost Assgnt" screen.
The screen only shows receipt entries (from Purchase Receipts and Transfer Receipts) that have Landed Costs for the Landed Cost Type Code of the Invoice line. If a Landed Cost Container No. has been entered on the Invoice line, only entries for that container are shown.
When the screen loads only receipt transactions that have not yet been invoiced will be shown, but as shown on the example screenshot below you can select the Show Closed Entries option, which will then enable you to select transactions that already have an Actual Cost posted against them. This is important if you receive multiple Purchase Invoices for the same Landed Cost (e.g. Freight) so that you can capture the total cost against the receipt transactions.
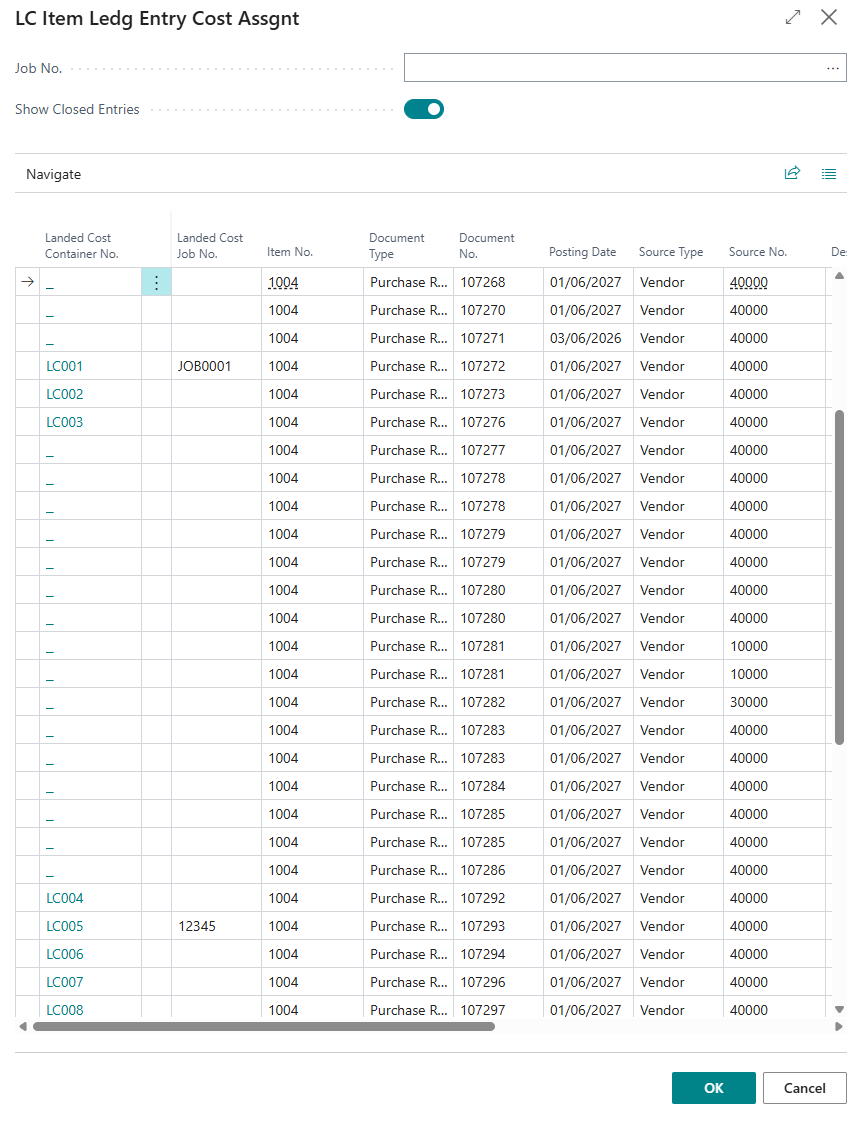
The following fields are available on the "LC Item Ledg Entry Cost Assgnt" screen.
| Job No. | Enter a Job No. to filter the entries by their Landed Cost Job No. The lookup opens the list of "Landed Cost Containers" and uses the Job No. of the container you select. |
| Show Closed Entries | Switch this on to also show entries that have already been invoiced. |
| Landed Cost Container No. | The Landed Cost Container that the Item was received on. |
| Landed Cost Job No. | The Job No. of the receipt entry. |
| Item No. | The Item that was received. |
| Document Type | The type of posted document, for example Purchase Receipt or Transfer Receipt. |
| Document No. | The number of the posted receipt document. |
| Posting Date | The posting date of the receipt. |
| Source Type | The source type of the "Item Ledger Entry", for example Vendor. |
| Source No. | The source number of the "Item Ledger Entry", for example the Vendor No. |
| Description | The description of the "Item Ledger Entry". |
| Location Code | The Location the Item was received into. |
| LC Cost Amount (Expected) | The expected Landed Cost for the Landed Cost Type of the Invoice line. |
| Entry No. | The "Item Ledger Entry" number. |
| Landed Cost Vehicle ID | The Landed Cost Vehicle that the Item was received on, if one was used. |
You can select Show Document from the Navigate menu to open the "Posted Purchase Receipt" for the selected entry.
Simply select all of the Entries that you wish to use and press OK to return to the "LC Cost Assignment" screen. Entries that are already assigned to the Invoice line are not added a second time.
Note: in the "LC Item Ledg Entry Cost Assgnt" screen you can also select a Job No. to filter the suggested Item Ledger Entries by their Job No, which can be useful where a third party has their own reference for containers which they quote on their correspondence.
Note: Get Entries does not hide entries that are already assigned on another Purchase Invoice that has not been posted yet, so check that you are not assigning the same receipt to two open Invoices. The Create Landed Cost Invoice wizard excludes these entries automatically.
Suggesting the Assignment
In the "LC Cost Assignment" screen, select Suggest Assignment to assign the Invoice line value to the selected receipt transactions. If multiple receipts are being assigned the invoice is allocated in proportion to the Cost Amount (Expected) for each "Item Ledger Entry". If none of the assigned entries has an expected cost, the Invoice line is split equally across them. Any rounding difference is added to the last line, so that Qty. to Assign always totals 1.
Note: entries you add with Show Closed Entries have a Cost Amount (Expected) of 0, so if you mix open and closed entries, Suggest Assignment gives the closed entries a Qty. to Assign of 0. Enter the Qty. to Assign for these lines yourself if you want them to receive part of the cost.
Close the screen to finalise the assignment and return to the "Purchase Invoice".
Posting the Invoice
When you post the Invoice, Clever Landed Costs checks each Landed Cost line:
-
the line must have at least one entry on the "LC Cost Assignment" screen
-
the Qty. to Assign for the line must total exactly 1
-
each assigned open entry must still have an expected Landed Cost to invoice
-
for a Landed Cost Type with the Charge Item cost treatment, the "General Posting Setup" and "Inventory Posting Setup" needed for the posting must exist
The Invoice line amount (in LCY) is then split across the assigned entries using the Qty. to Assign, and an Invoice entry is posted to the "LC Ledger Entries" for each one, closing the expected cost on the receipt entry.
The resulting "General Ledger Entries" show the reversal of the expected and actual landed costs posted, with any variances going to the Variance Account specified on the Landed Cost Type (or the Transfer Variance Account for costs received on a Transfer Order). For a Landed Cost Type with the Charge Item cost treatment the actual cost is posted to the Item as an item charge instead. See Financial Postings for full details of the entries posted for each cost treatment and costing method.
Note: Where Standard Cost is in use on an Item Card and multiple Landed Costs are assigned by different Locations using SKU's, then there will be no Purchase Price Variance recorded. This is because the Purchase order and Purchase Invoice are both received and posted at the same Base Cost.
The Landed Cost Type Code is kept on the posted invoice lines and is shown on the "Posted Purchase Invoice" screen. The Landed Cost Job No. and Landed Cost Container No. fields are also available but hidden by default.
Using Edit in Excel for Landed Cost Assignment
To use Edit in Excel for Landed Cost Assignment, follow these steps:
-
Open the "Purchase Invoice" that contains your Landed Cost Invoice lines.
-
Navigate to the relevant Invoice line, then select Line > Related Information > Landed Cost Assignment to open the "LC Cost Assignment" screen.
-
Use Get Entries to load the relevant Purchase Receipt Item Ledger Entries into the assignment screen.
-
Select Actions > Functions > Edit in Excel. This will open an Excel file of the "LC Cost Assignment Lines", filtered to the current document, Invoice line and Landed Cost Type.
-
In Excel, update the Qty. to Assign column for the lines you wish to modify. This controls how much of the Invoice line cost is applied to each receipt entry.
-
When you have finished making changes, click Publish in the Excel file to write the updated values back to Business Central.
-
Return to the "LC Cost Assignment" screen in Business Central to review the updated assignments before proceeding to post the Invoice.
Note: Only the Qty. to Assign field should be updated via Edit in Excel on this screen. The other columns are provided for reference only, and lines cannot be added or deleted from Excel.
Note: You must have the appropriate permissions to export data to Excel within your Business Central environment. If the Edit in Excel action is not visible, please contact your system administrator to confirm that you have the required access.
Cancelling or Correcting a Posted Landed Cost Invoice
If you need to reverse a posted Landed Cost Invoice, use the Cancel or Correct action on the "Posted Purchase Invoice" screen in the usual way. The landed cost entries and variance postings are reversed automatically, and the receipt entries are reopened so that they can be assigned and invoiced again. The same happens when you manually post a "Purchase Credit Memo" whose Applies-to Doc. No. is the posted Landed Cost Invoice.
See Undo Receipts and Reversals for full details of the entries that are created.
Note: Landed Cost assignments are not needed or checked on a "Purchase Credit Memo", so you do not need to use the "LC Cost Assignment" screen when you post a credit memo.