Now that your Setup is complete, you need to create your default "Payment Plan Templates". These templates are required so that 1, you can assign a template per customer in order to have different Customer setup and 2, so that when using these on "Sales Orders", the basic requirements for the plan are already setup resulting in less manual changes by the Users.
No two Customers are the same so catering for tailored templates is a great way to ensure enhanced flexibility and more automation within Business Central.
Searching for "Payment Plan Templates" will open up an editable list page such as below.
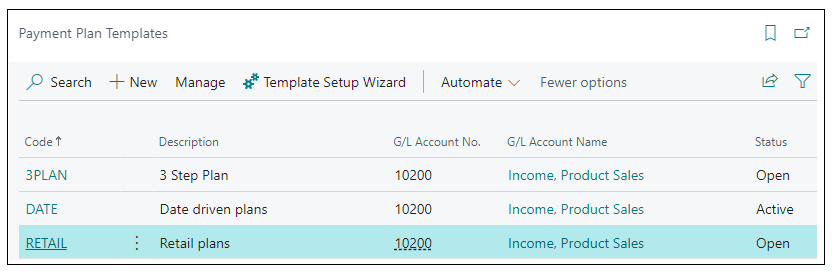
From the ribbon, you have the ability to create a new template from the +New button. Alternatively, clicking into Manage will give you options to either Edit, View or Delete an existing template. Similarly to the "Payment Plan Setup" page, there is also a Template Setup Wizard providing step by step guidance on how to create a new template.
Selecting +New to create a new "Payment Plan Template" will open up a card with 3 key areas. The General FastTab, the Lines FastTab and the Created/Modified By. This last one remains un-editable and will merely store information for reference.
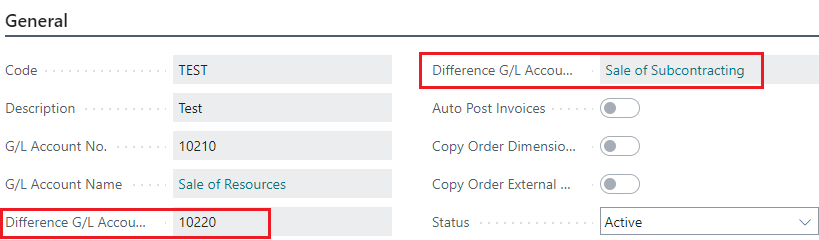
General FastTab
Firstly, the template needs a unique Code so that it is easily identifiable when working with multiple customers and multiple templates. Once that is populated, enter a Description. This is not a description that will appear on your Sales Invoices or Credit Memo's but this still needs to be clear enough for the Users to know what it is.
Next, the G/L Account No field needs to be populated. From the dropdown, you can select an existing G/L Account from your "Chart of Accounts". This is the G/L Account you want to post the invoices to. When this is chosen, the G/L Account Name field will auto-populate with the account description from your "Chart of Accounts" and cannot be edited.
In the instance of wanting to post a difference to an alternative G/L Account (think in the scenario of using a 'Staged Payment' to cover 100% of the Sales order value but then once the invoice was created, you under shipped or reduced the value of the order, you would not be able to create a 'Closing Invoice' with a minus Value. Therefore, by populating the Difference G/L Account No field with an alternative G/L Account, the difference in value would get posted there, reducing the 'Closing Invoice' down to Zero to be able to post. This then allows you to report on any differences posted.
The Auto Post Invoices toggle will automatically default to the option chosen for this field on the "Payment Plan Setup" page. As this can be changed per Template, you can change this to 'Yes' or 'No' as you see fit. Where this is 'Yes', any "Sales Orders" using this template will automatically create "Posted Sales Invoices" and where 'No', only "Sales Invoices" will be created which will need to be manually posted.
The 2 fields from the Payment Plan Setup Invoicing FastTab on the "Payment Plan Setup" page are also included here and are defaulted to the values chosen within the Setup. You can however edit the Copy Order Dimensions to Payment Plan Invoice and Copy Order External Document No to Payment Plan Invoice toggles per template to have more control over the setup. More information on how these are used are detailed within the Payment Plan Setup heading.
Finally, the Status field has 3 options to choose from, 'Open', 'Active' and 'Closed'. New templates will always default to 'Open' and should be kept in this Status where changes are still being made to the template or you do not want it to be assigned to Customers yet. Where 'Closed' is used, this cannot be added to Customers cards (Only 'Active' ones can be chosen) and implies the "Payment Plan Template" is no longer used. Only 'Active' templates can be chosen on Customer cards and both the General FastTab and Lines Fasttab must be complete before using this Status. Changing the status to 'Closed' when already assigned to a Customer will result in an error. Therefore, removing the assignment from the Customer card must be done prior to closing the template.

Lines FastTab
The lines fasttab is the place to store how you want the invoices to be created. This information here will transfer to new "Payment Plans" on "Sales Orders" so the more you populate here, the more automated the process.

The first line will always default to Invoice Type 'Staged Payment' but the other option you can select here is 'Closing Invoice'. 'Staged Payments' are invoices that will be created based on either specified dates you enter to create the invoices or by events (on release, shipment etc). You can have as many lines here as you wish. The only limitation is that you cannot have more than 1 line for the same Invoice Trigger Type (so you could never have 2 Invoice Types for 'release' as an example). The Invoice Type is just a means of recording what type of Invoice you want Business Central to create. 'Closing Invoice' must exist as a line within the Lines FastTab in order to make the template 'Active'. This is simply a final invoice that gets created for the Customer from the "Sales Order" for the balance of the order. For example, if you have 2 staged payments, 1 for 50% of the sales order value and another for 30%, the 'Closing Invoice' would create for the remaining 20% order value so whatever was not invoiced from your 'Staged Payments', this will include. In the example where the two 'staged payments' were both for 50%, the 'Closing Invoice' would be created with zero balance. The 'Closing Invoice' when created will display a breakdown of the 'Staged payments' that relate to the invoice.

As 'Closing Invoices' will just calculate the balance of the "Sales Order" which hasn't been invoiced for, no further information needs to be filled out so the remaining information below relates to 'Staged Payments' only.
Value Type must now be selected which can be either '%' or 'Fixed Amount'. Where '%' is used, this implies you want to create your invoices based on a percentage of the "Sales Order", in which case the Default % field must be populated with the percent amount you want to create the invoice for. This will error if you try to assign more than 100% across the invoices. Where 'Fixed Amount' is selected within Value Type, this means you want your invoice to be created for a specified value in which case the Default Fixed Amount field must be populated with this value.
The Invoice Trigger now needs to be chosen which can either be 'Date' or 'Event'. Selecting 'Date' will mean when the "Payment Plan" is created on the "Sales order", dates can be set at that point to confirm when the invoices are to be generated, based on 'Today's Date'. These do not need to be set at template level. Where 'Event' is chosen, the Invoice Trigger Type must also be populated on the Template to confirm at what stage the invoices will be created. Options here include 'Release', 'First Shipment', 'Last Shipment' and 'Delivery Date'.
- 'Release' - When a "Sales Order" is released, the 'Staged Payment' will be marked as Ready to Invoice so that the invoice can be created. If the "Sales Order" is re-opened, the payment plan will be deleted.
- 'First Shipment' and 'Last Shipment' - When a Shipment has been processed against the "Sales Order", the 'Staged Payment' for this will be marked as Ready to Invoice. If all the goods from the "Sales Order" are shipped together in full and you have another 'Staged Payment' for 'Last Shipment', then this will also be marked as Ready to Invoice. 'Last Shipment' is therefore only marked as Ready to invoice when the final shipment is processed against the "Sales Order" that leaves nothing remaining to be shipped. This takes into account the Undo Shipment functionality so the 'Staged payments' will be updated on the "Payment plan" accordingly where this has been done.
- 'Delivery Date' - Where this is used as an Invoice Trigger type, the 'Staged Payment' will get marked as Ready to invoice when the Shipment Date + the Shipping Time from the "Sales Order" has been reached. For example, in the below scenario, the Shipment Date is '06/09/2023' and the Shipping Time is '3D' (3 days), so the invoice can only be created as of '09/09/2023'.

As mentioned above, the template will not allow for multiple lines with the same Invoice Trigger Type. The only way this is acceptable is on the "Payment Plan" itself, when a 'Staged Payment' line has been fully credited and you need to create a new 'Staged Payment' line for the same 'Event'.
The Payment Terms Code can be populated for both the 'Staged Payments' and the 'Closing Invoice' if required. These will override the Payment Terms Code set against the Bill-To-Customer from the "Sales Order" to use these when calculating the Due Date for the Payment Plan Invoices. Where this is left blank on the template, the "Payment Plan" will use what is set on the Bill-To-Customer as default.
To allow more control over when invoices are created or add in preventative actions, you can utilise the below tickboxes within the Lines section of the template.

Manual invoices can be ticked for all Invoice Types and are used for invoices you want to create manually from the Payment Plan Card. This means when you use the automated process to run Invoice creation, the Manual invoices are automatically ignored and will not be created.
The Prevent Trigger Action can only be used when Manual Invoice is 'Yes' and can only be selected for 'Staged Payments'. Where this is 'Yes', the Manual Invoice has to be created before the Invoice Trigger Type event can occur.
For example, below I have 2 'Staged payments' set up, both of which are based on 'Events'. The first one for 'release' has no additional setup so the automated invoice creation process will create the invoice for this automatically when the "Sales Order" is released. However, for the 2nd 'Staged Payment', this is a Manual Invoice and I have Prevent Trigger Action set to 'Yes'. As my Invoice Trigger Type for this 'Staged Payment' is 'First Shipment', this means I have to manually create the invoice for this line prior to posting the first shipment from my "Sales Order". I will not be able to Ship the goods until the Invoice is created.

If I try to ship the goods before the invoice has been created, I get this error:

Therefore you are preventing the Trigger action from being done prior to the creation of the invoice.
You can go one step further on the "Payment Plan Template" by changing the Require Payment box to 'Yes'. This is only used in conjunction with the previous 2 options so will continue to require the invoice to be created prior to the Trigger action being done, but it will also check to see if the Invoice has been paid by the Customer. If it has, providing the invoice has been created, the Trigger action can be processed. However if the Invoice has not been paid, a different occur will occur.

This therefore means not only will the Payment Plan line require the Invoice to have been created before the trigger action can be done, the Invoice must also be paid.
All 3 options here can also be changed on the "Payment Plan" itself.
Created/Modified By
This last FastTab on the template is merely used to record information about the template itself. The Created by User ID field will populate with the Users User Name on creation of the template. If anything is changed on the card after it has been created, the Modified By User ID will be populated with the relevant User Name as well as recording the Modified Date/Time field with when it was changed.
