Before you start using Clever Document Links you must complete the "Document Links Setup".
Note - You cannot select SharePoint (Legacy). The authentication method required by SharePoint (Legacy) is no longer supported by Microsoft. To use SharePoint document storage, select 'SharePoint' and configure modern authentication. This option will be removed in a later version.
When installing on a SaaS environment you will be automatically prompted to complete the setup on install of the app. Alternatively the setup can be accessed from either the "Assisted Setup" Screen or by searching for "Document Links Setup".
On the Ribbon of the Page, the below options are available:
| Setup |
Once within the setup you can access other setup screens related to Clever Document Links from the Setup action. This will allow you to open the pages for creating Document Attributes, Document Types and Search Fields. Document Attributes - To facilitate finding files in both Business central and SharePoint it is strongly recommended that you configure Document Attributes. Document Attributes allow you to tag files with appropriate MetaData to allowing searching of your file Archive. See Document Attributes for more information. Document Types - To setup Codes for each document and add a description Search Fields - See Document Link Search Fields for more information. Migrate Standard Document Attachments - the ability to convert standard Business Central Document Attachments into Clever Document Links. |
| Default Configuration |
Please refer to the Default Configuration for more information. |
| Sharepoint |
When you select this Action on the Ribbon, the below Options will be displayed: Sharepoint Setup - This option launches the SharePoint Setup Wizard (which is also triggered when changing File Storage option to SharePoint. For full details on how to setup the SharePoint connection pre-requisites and Clever Documents Links for SharePoint file storage option, read the setup guide. Test SharePoint Connection - You may want to run Test SharePoint Connection to confirm SharePoint Integration is successfully configured or if you are having problems using Clever Document Links with SharePoint. Migrate Archive - You may want to migrate your file repository from Database to SharePoint. The File Storage field will firstly need to be changed to SharePoint. After completing the SharePoint Setup Wizard, you should then select the Migrate Archive action. This will then move the documents into the SharePoint area defined automatically. A confirmation message will be displayed once complete. |
| Azure Blob Storage |
When you select this Action on the Ribbon, the below Options will be displayed: Azure Blob Storage Setup - The Azure Blob Storage Setup Wizard will be run automatically on changing the File Storage attribute to Azure Blob Storage or you can run this manually be selecting this Action. Test Azure Blob Storage Connection - You may want to run Test Azure Blob Storage to confirm that Integration is successfully configured or if you are having problems using Clever Document Links with Azure Blob Storage. Migrate to Azure Blob Storage - You may want to migrate your file repository from Database to SharePoint. The File Storage attribute will firstly need to be changed to Azure Blob Storage. After completing the setup wizard, you should then select the Migrate to Azure Blob Storage action. This will then move the documents into the relevant Azure Blob Storage Container automatically. A confirmation message will be displayed once complete. |
| Azure File Storage |
When you select this Action on the Ribbon, the below Options will be displayed: Azure File Storage Setup - The Azure File Storage Setup Wizard will be run automatically on changing the File Storage attribute to Azure File Storage or you can run this manually be selecting this Action. Test Azure File Storage Connection - You may want to run Test Azure File Storage to confirm that Integration is successfully configured or if you are having problems using Clever Document Links with Azure File Storage. Migrate to Azure File Storage - You may want to migrate your file repository from Database to SharePoint. The File Storage attribute will firstly need to be changed to Azure File Storage. After completing the setup wizard, you should then select the Migrate to Azure File Storage action. This will then move the documents into the relevant Azure File Storage Container automatically. A confirmation message will be displayed once complete. |
The Fields available on the Page are the shown below and can be completed as required.
| File Storage |
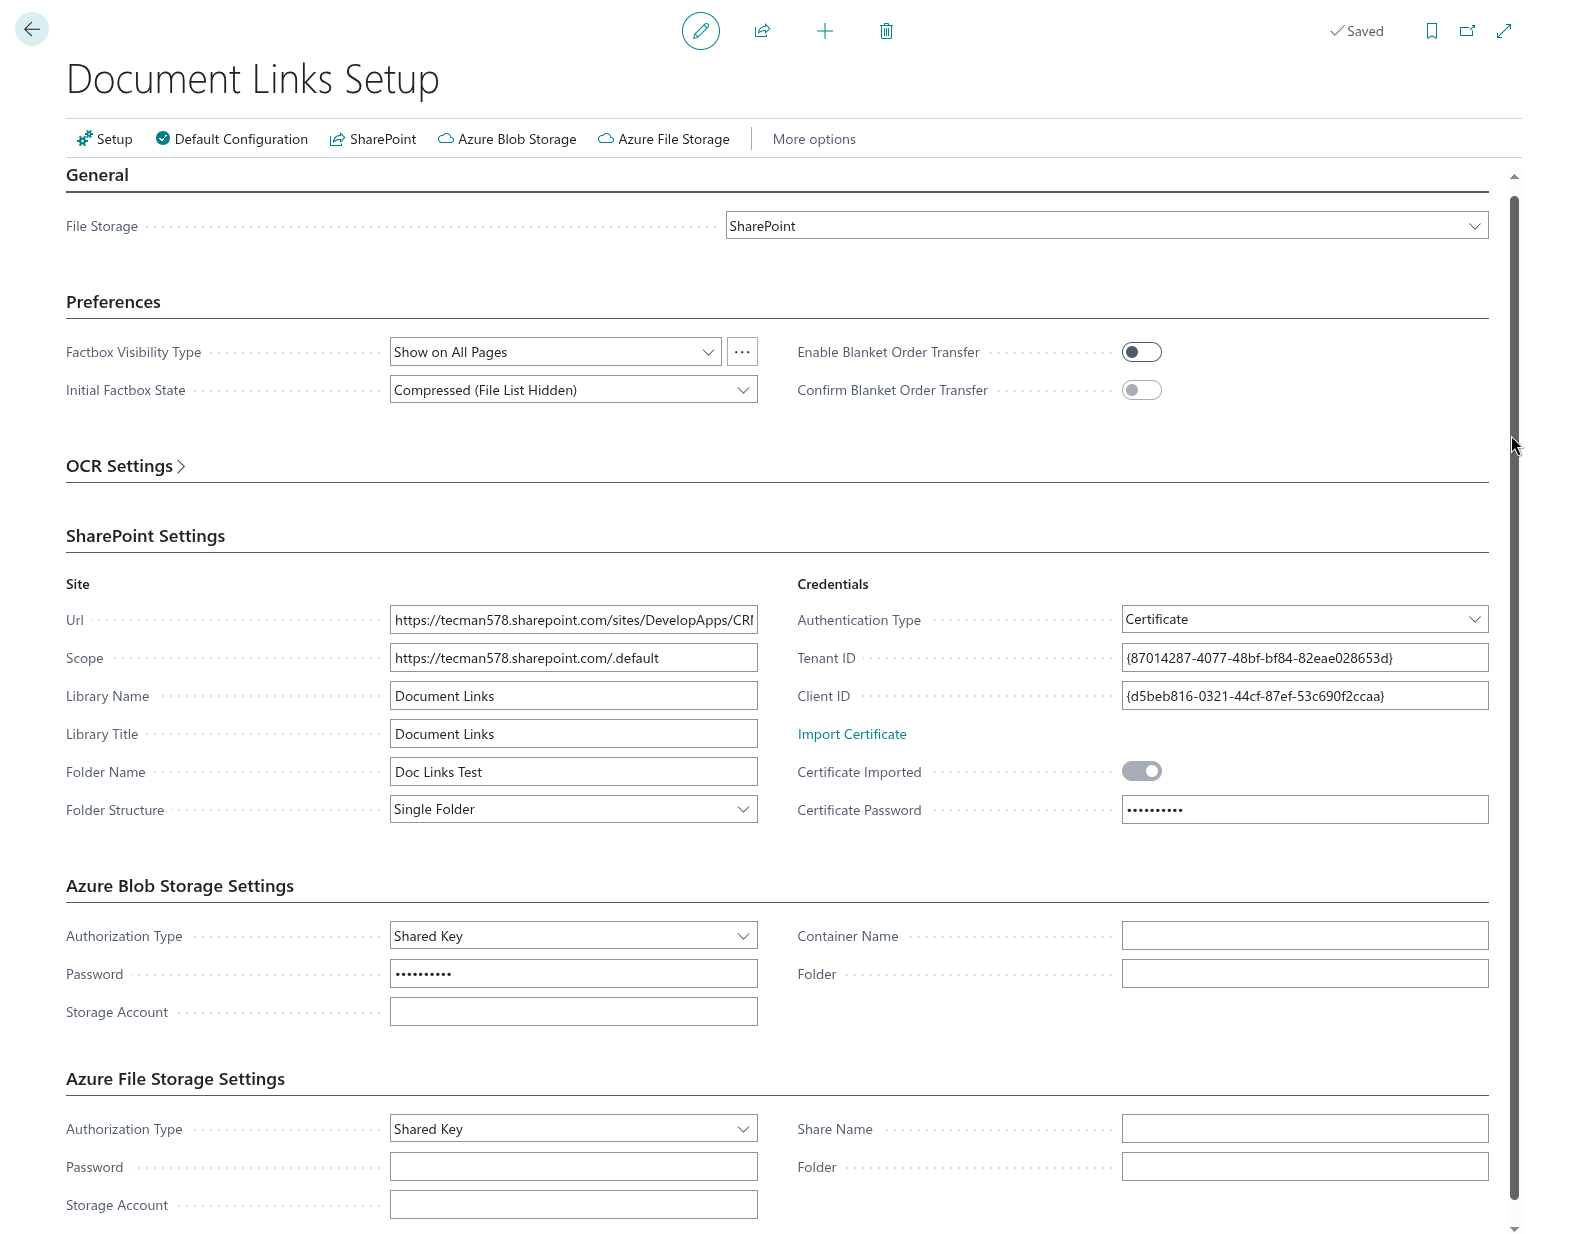
The most important piece of setup is to determine where you want to store your documents. Selecting the field File Storage you have some options which may differ dependant on the version you are using. Anything Pre-Version 2.0 will display;
Version 2.0 and later will display;
Consider the most appropriate location to store your documents. If you are expecting to use a small number of documents with Clever Document Links then storing within the Business Central database may be the best option, however it should be noted that may significantly increase the size of the Business Central database. If you are planning on storing larger number of documents and do not require SharePoint collaboration for documents, then Azure Blob Storage or Azure File Storage will generally be the best option due to the data storage cost benefits in comparison to SharePoint. If you select Database then no further setup in regards to the file storage is required. If you select one of the other options then you will need to provide connection information for the relevant environment, be that SharePoint or Azure. |
| FactBox Visibility Type |
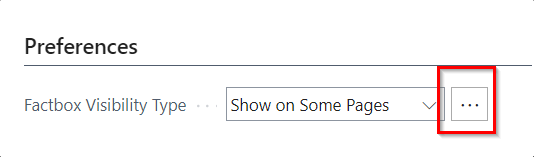
This Field should be used to control which Pages the Document Links FactBox should be visible. The options to select from are: Show on All Pages - If you select this option, then the FactBox will be displayed on all Pages. Show on No Pages - If you select this option, then the FactBox will not be displayed on any Page. Show on Some Pages - If you select this option, then the FactBox will only be displayed on the Pages you have selected. To select the required Pages, you will need to click on the Assist Button next to the Field.
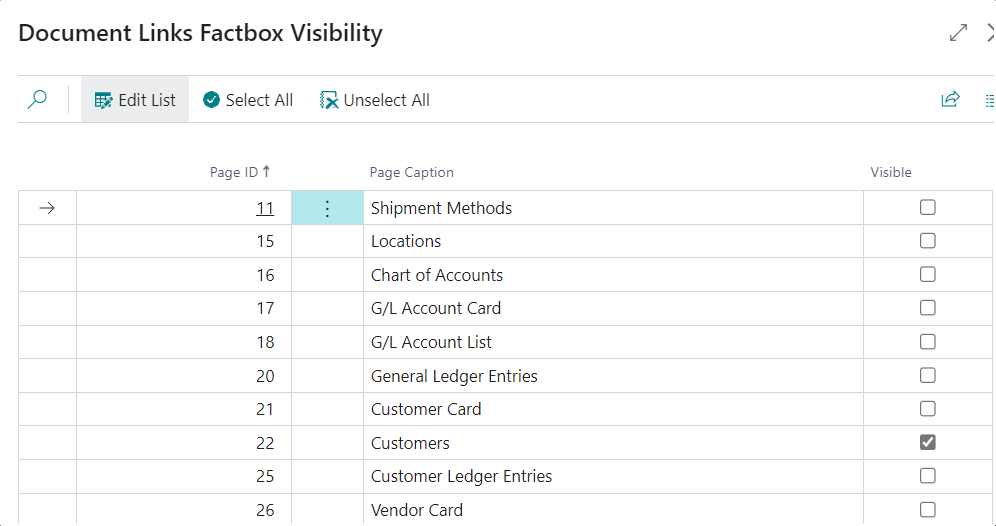
This will display the Document Links FactBox Visibility Screen showing the full list of supported Screens. You should use the Visible column Checkboxes in order to define if it should be shown or not.
|
| Initial FactBox State |
This option allows you to specify some initial settings for the Document Links File Drop FactBox. Choose the initial state for the Factbox. Options are:
Note: this Setting only relates to the initial state of the FactBox and can be changed on each Page. The setting will be remembered by Page/User Combination. |
| Enable Blanket Order Transfer |
If using Clever Trade Plus and specifically the Sales Blanket Order Auto Consume functionality, you can ensure that any Document Links associated to the Sales Blanket Order are transferred to related Sales Orders by setting this option. |
| Confirm Blanket Order Transfer |
If the Enable Blanket Order Transfer is activated, then this field will control whether a user is prompted to transfer associated Document Links or whether the Links will always be transferred to the associated Sales Order. Enable the setting to show the confirmation to the user, or alternatively leave the toggle off to transfer links automatically without user interaction. |
If you want to use Optical Character recognition with lever Document Links then the OCR Settings FastTab should be completed be entering an OCR Service User and Password for the OCR service. Populating these fields will enable Microsoft Dynamics 365 Business Central to read barcodes and find a record to match them within the database. See for OCR Setup more information.
Note - If you wish to use the OCR Functionality, you will need to purchase the OCR Service separately.
In order to use OCR to automatically assign document to the correct records in Business central you should also review both Document Types and Search Fields if these have not be created by the default configuration.