The "Payment Plan Setup" page is the first screen that should be opened when the app is installed as this page holds the default instructions on how the payment plans will be created.
Typing the page name into the search bar will open up the page below.
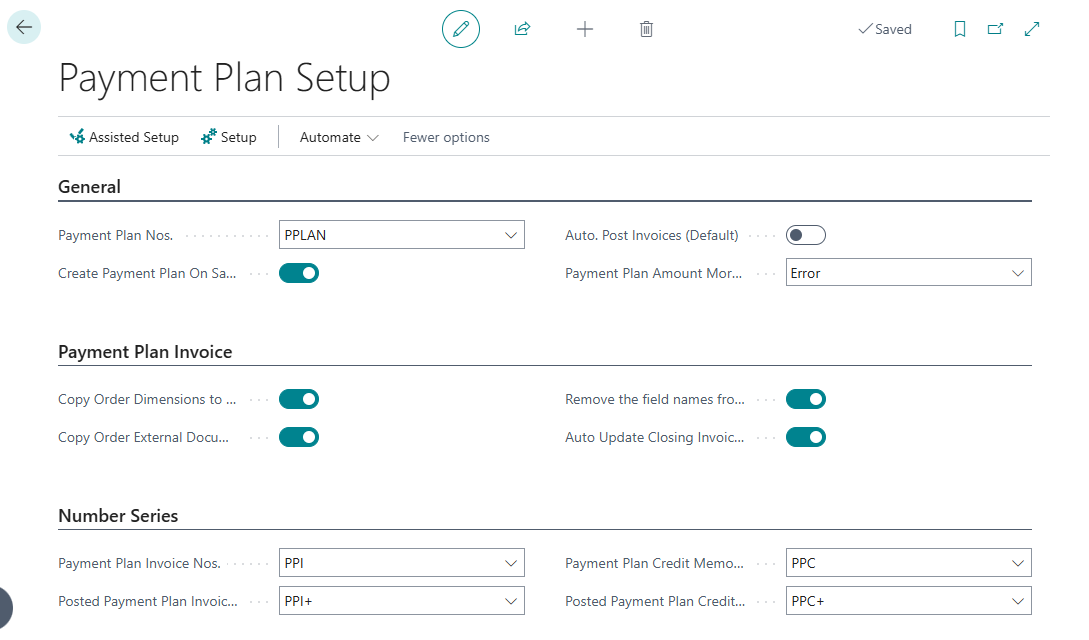
Firstly, you will need a "No Series" to be created which can then be chosen within the Payment Plan Nos field. This will then ensure any Payment plans created will use the "No Series" provided.
Next, there is a toggle for Create Payment Plan on Sales Order Release. Automatically defaulted to 'No', this means that a "Payment Plan" must be created manually per Sales Order. Where this is 'Yes', when you release the "Sales Order", a "Payment Plan" will automatically be created.
The Auto. Post Invoices (Default) toggle is also automatically defaulted to 'No'. This means that when a "Payment Plan Template" is created, the field of the same name within the Templates will default to 'No' also. Where 'Yes' is selected here in the setup page, all templates will default to 'Yes'. This can be changed individually per "Payment Plan Template" to be more specific about what "Sales Orders" this is used on if necessary.
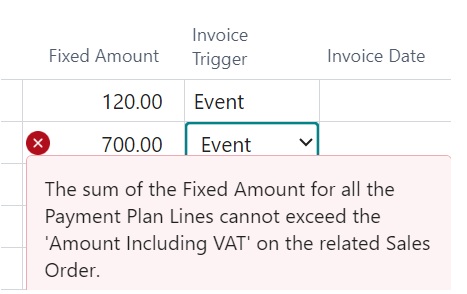
The Payment Plan Amount More than Order Amount Behaviour field is used when amending the values within a Payment Plan after 1 of the 'Staged Payments' has already been invoiced. For example, if using the option of 'Error' and I have invoiced a 'Staged Payment', but I then try to change the Fixed Amount for a remaining 'Staged Payment' so that it exceeds the total of the Sales Order value, I will get an error as per below image.
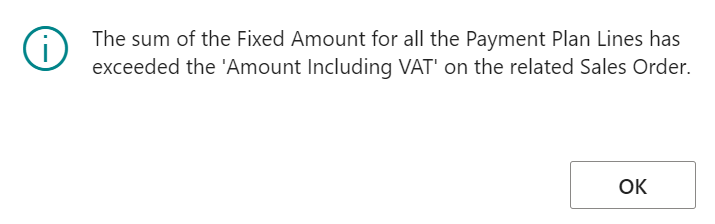
However, if I use the option of 'Message', and I perform the same change, I will instead get a warning message like the image below.
Payment Plan Invoice FastTab
The Copy Order Dimensions to Payment Plan Invoice toggle can be changed to 'Yes' if you want the "Sales Order" Header dimensions to also be pulled across to its associated Invoice. This simply checks all the dimensions in the "Sales Order" and ensures they are pulled through when the Invoice is created. Having this as 'No' will still create the invoice but won't pull across the Dimensions from the "Sales Order".
Similarly, if you are populating the External Document No field on the "Sales Order" and you want this to be transferred to the Payment Plan Invoices, ensure the Copy Order External Document no to Payment Plan Invoice toggle is changed to 'Yes'. Leaving this as 'No' will still allow you to populate it on the "Sales Order" but it will not be pulled across into any of the invoices created from the Payment Plan. Both of these fields default the settings to the "Payment Plan Template" so whichever options you choose for them will be transferred to the templates you create. These can both be changed on the templates themselves.
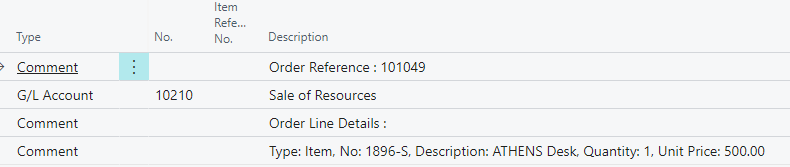
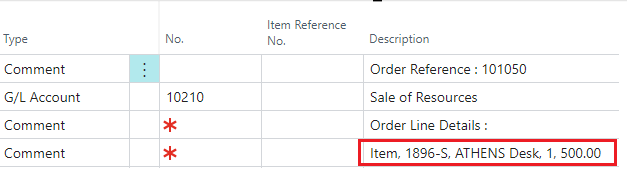
The Remove the field names from the Invoice Line comments is defaulted to 'No' and is used to show how your lines appear on the 'Staged Payment' invoices. Leaving is as 'No' will produce the invoice lines like the below image, showing the Field names of the information before the data per line such as Type, No, Description etc.
Changing the toggle to 'Yes' will remove these field names on the lines and show the 'Staged Payments' like the below image instead.
The field Auto Update Closing Invoice when using 100% Staging is applicable for Sales orders where the 'Staged Payments' make up 100% of the order value so the 'Closing Invoice' calculates initially as Zero. This toggle is only required to be 'Yes' in the instance where you may end up increasing the value on the Sales Order after one of the 'Staged Payments' has already been invoiced and you want the 'Closing Invoice' to return to Zero. In doing this, the remaining 'Staged Payments' will be changed from '%' to 'Fixed Amount' and auto calculated at the remaining amount to ensure both 'Staged Payments' still cover 100% of the sales order.
Example below shows how the Payment Plan will be updated where the Auto Update Closing Invoice when using 100% Staging is 'Yes' and I increase my Sales Order value to exceed the amount from my 1st 'Staged payment'.
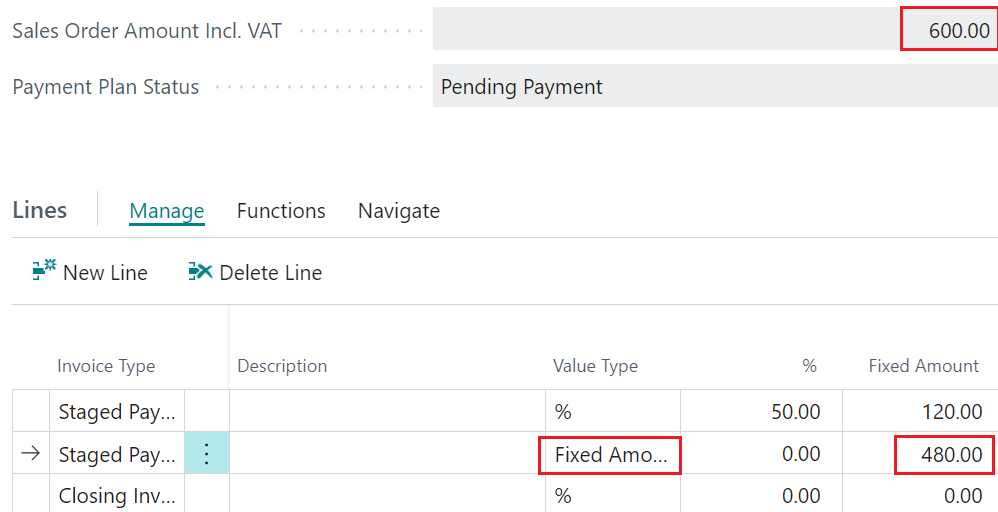
Initially both 'Staged Payments' were 50% each, but as I have already invoiced the first one and then increased my Sales Order Value, the 2nd 'Staged Payment' can no longer remain as 50% because it would leave a balance in the closing invoice. Therefore it is updated to reflect a 'Fixed Amount' and updates my Fixed Amount to show the correct balance, ensuring that my Payment Plan is therefore made up of 100% across both 'Staged Payments'.
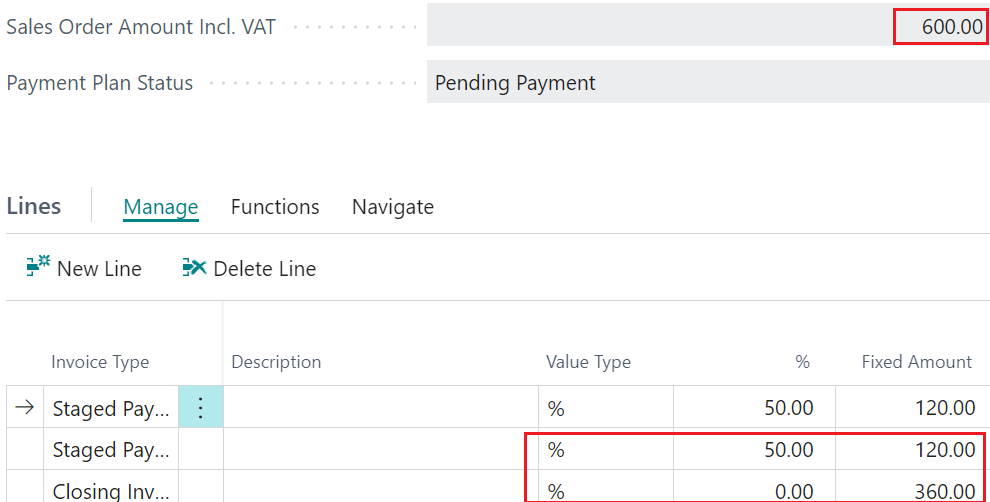
If I do this exact process again but with the Auto Update toggle 'Off', you can see my 2nd 'Staged Payment' remains at 50% which only covers the original calculated balance, so the remaining amount HAS to be pushed to my 'Closing Invoice' to cover the difference. Therefore, if you want your 'Staged Payments' to truly cover 100% of the sales order value without relying on the 'Closing Invoice' where Sales Order values are increased, you need the Auto Update Closing Invoice when using 100% Staging switched 'On'.
In the ribbon on this page is a Setup Wizard. Clicking into this field will allow the user to populate the above fields exactly the same, however it will provide more information about the purpose of each field so this is particularly useful if Users require a little more guidance when completing this page.
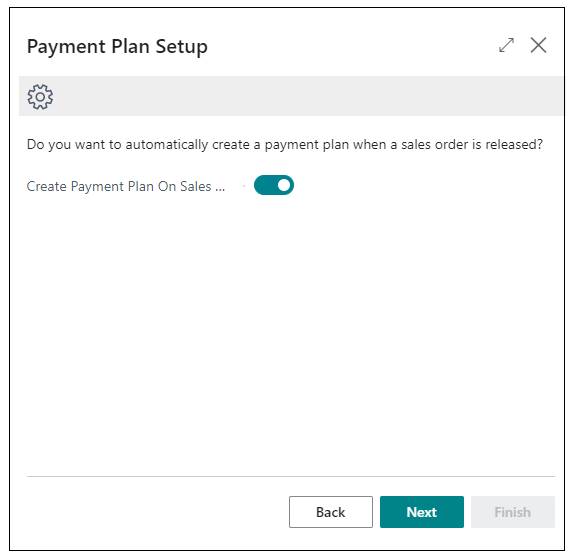
Simply follow the on-screen instructions pressing Next once each field is populated and clicking on Finish when you reach the end of the setup wizard. This will populate your fields on this page and complete the setup.
Payment Plan Number Series FastTab
This section provides setup fields to configure separate number series for Payment Plan documents. You can assign distinct number series for Payment Plan Invoice Nos., which are used for Payment Plan invoices. Posted Payment Plan Invoice Nos., applied to Payment Plan invoices once posted. Payment Plan Credit Memo Nos., dedicated to credit memos generated from Payment Plans. Posted Payment Plan Credit Memo Nos., applied to credit memos once posted.
When these fields are populated, the assigned number series will override the standard Business Central numbering sequences for these document types, allowing greater control and clarity in transaction tracking.