Some of our Apps require a dependency, the installation of Clever Document Delivery is one of those apps. The Application Clever Config will be installed at the same time as Clever Document Delivery as it has a dependency on some of its features. If you have installed Clever PrintNode Integration this can also be used to print any documents that may still need to go by the traditional print & post route.
Note: You should not uninstall Clever config if you plan on using the Clever Document Delivery App.
Unlike some of our other apps, Clever Document Delivery requires all your setup to be done manually, which consists of you going into each of the setup pages (highlighted throughout the user guide) and creating the required business setup. We do however, provide a Default Configuration option which will default some setup for you.
Below we will explain the requirements for manually setting up the app and how importing the default configuration will save you time in getting the app ready for use. The first thing to do is navigate to "Document Delivery Setup" screen. This can be accessed through the search function in Business Central, Search Document Delivery Setup and select the relevant link.
Once on the "Document Delivery Setup" screen you will see the different options available to you.
The first thing to do is click on the Actions tab on the ribbon and select the option Default Configuration.
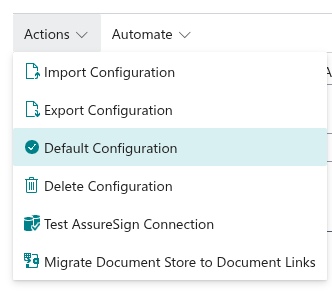
On the Ribbon Menu under Actions, select the option Default Configuration, it will bring in the main Document Types and the setup behind them, such as Attachments and Fields. It will also populate some default Frequency Codes in the "Auto Send Frequency" screen, detailed here for automatic sending of Customer Statements.
Other actions on the tab include: Import, Export, Delete and Migrate Document Store to Document Links, depending on what your requirement is the appropriate action will occur. The use of Import & Export Configuration is most likely to be used in circumstances where you have more than one company and require the same configuration setup to be replicated in another.
With the Default Configuration imported you still have a few options on the "Document Delivery Setup" screen that you can choose from, manipulating the way in which you would like the app to work.
General FastTab
Choosing a Default Batch Send Behaviour from the drop down to be set as either Single Attachment or Multiple Attachment's controls if attachments are combined or sent as single attachments.
If you select the option Protect Password, you are choosing not to show the password given to each customer and vendor that chooses to protect the documents sent out. This simply masks the password indicating to your user that a password is there they just don't know what it is. More information on utilising the password functionality can be found here.
The Keep Document Logs For field should be populated with a formula time limit (i..e 1Y) that will be used when retaining information regarding what documents have been sent.
We can decide if we would like to see the "Document Type Summary" screen before we send or queue mails or Preview the emails with the Show Document Summary field. Here, we can define if the summary displays 'Always', for 'Multiple Only' or 'Never'.

- If 'Always' is chosen, the doc summary will always be displayed regardless of how many entries are selected.
- If 'Never' is chosen, the doc summary will never be displayed, regardless of how many entries are selected
- If 'Multiple Only' is chosen, when more than 1 entry is selected, the doc summary will display. If only 1 document is chosen, the doc summary is not displayed.
The Prevent Send Prior to Release field can be used to determine whether or not a document can be sent via Clever Document Delivery before they are Released.
Document Storage
You can define how you want the app to retain stored documents by the Use Document Links Storage toggle. If you leave this as No, any documents that are stored (as defined on the "Doc. Delivery Document Types" screen) will get saved to the "Doc. Delivery Document Store" screen. If this toggle is changed to Yes, then the system will use the storage method defined for Document Links (if this is installed).
Where Use Document Links Storage is set to Yes and SharePoint Integration has been configured, the Migrate Document Store to Document Links action is available on the Actions tab of the ribbon. Selecting this will take any documents currently held in the "Doc. Delivery Document Store" screen and move them to Document Links. Given the potential volume of documents that may be stored, the action provides the option to run the process in a background session or instantly, with the latter displaying a progress window.
Printing
The Print Handler Implementation field will be pre-populated based on which printing options you have setup and what your client allows you to use.