Creating your Tenant
Note: it is only possible to setup a Demo environment if you are a Microsoft Partner and is not applicable to End Users of Business Central.
If you are a Partner and you wish to setup a demo environment for Clever MES, below are the steps to take in order to create the environment you need.
Navigate to the following URL: demos.microsoft.com. Choose the option Work account and when prompted login with your work account.

Once you have logged in on the Microsoft page there is a toolbar along the top of the page, with several options including the option My Environments. Click on this to get to the next page.

On the environments page click on the button Create a Tenant
Note: Any tenants that you have created previously will be visible on the page

When you click on the Create a Tenant option, you will be prompted to say what type of demo environment you want to create in this case you should choose Microsoft 365 Enterprise Demo Content.
Selecting this option will take you to another page where it will take a few minutes to create the environment. Once created you will be presented with an Admin Username and Password.
With your environment almost created you know go to businesscentral.dynamics.com. Click on the Getting Started action and choose the Business Central option.

Sign In with the details you were given on creating the tenant. This will link that demo environment to your tenant.
Note: to get back into your demo environment go to home.dynamics.com and click on Business Central App tile.

Installing the Apps
Once in your demo environment you will need to add our app to the tenant to do this navigate to the Extension Management Page. On the page click on the manage action Extension Marketplace

This action will take you to AppSource where you will need to navigate through the website to find our App Clever MES. Click on the Free Trail option. This will take you to a form required to be filled in for the installation of the app. Once completed you will then be taken back to your demo environment to complete the installation.

Once installed the following three apps will appear on the Extension Management page, Clever MES along with Clever Portal Framework and Clever Config which are dependency apps.

Setting up your Demo Environment
The next step is to enable the Premium Experience. Enabling the premium experience means that all actions and fields for all business functionality, including Manufacturing and Service Management.
To do this navigate to the Company Information card.

Once on the Company Information card, scroll down to the User Experience FastTab and click on the field Experience this will bring up 2 options to select from Essentials or Premium (by default this field will be set to Essential)
Now you need to import and apply the extended packages, this is to get some of the Manufacturing data you will need when configuring the app.
Navigate to the Configuration Packages page and choose the function Import Predefined Packages

From the predefined packages choose to import and apply the package labelled GB.ENG.EXTENDED.
With the initial setup complete you now need to create some orders ready for when you start to use Clever MES. To start with you need to calculate the calendars for both Machine centers and Works Centres.
To do this navigate to the Machine Centres page.


Click to navigate to the Calendars action. On the Machine Centre Calendar page, click on the Show Matrix button
It is within the Matrix screen that you run the calculate calendar function.
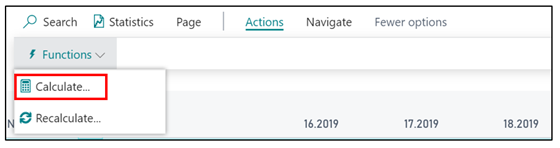
Once the Machine Centre Calendars have been calculated you need to navigate to the Work Centres screen and do the same there. On the process action you will find the Calculate Work Centre Calendar.

The final step is to create some Released Production Orders based on the Machine Centers and items in your demo environment. These production orders will be what you see on the devices once you have setup the app.
MES Setup
Now that all the background data and setup has been done you can begin setting up the Clever MES app.
Run the Default Configuration on the MES Setup page, installing all the default setup enables you to start using the app much quicker.
Once you have run the Default Configuration you will notice other actions that you can run. Once action you need to run after the default configuration function is the Register Application option.

By choosing this option you are giving consent to the MES App to read data from your Microsoft Dynamics 365 Business Central.
Note: it must be an administrator that does this as they are giving consent for the whole organisation.
Clicking the option, it will notify that only an administrator can give consent for users to use this application and if you would like to begin the process. Click Get Started to continue

You will be prompted to then login as administrator, if at this point you don’t have the correct credentials don’t worry the administrator can log in later using the function Authorisation, on the MES Setup, actions tab to complete the authorisation.
If the credentials are correct you will be then asked to Accept the Permissions for your Organisation.
Once complete you will be redirected to your portal to choose the company you are working in to begin your production process.
If at any point you close the device portal and need to navigate back, you can click on the following option Browse to Portal, which is an action on the MES setup page.
