The "Landed Cost Setup" screen controls how the Clever Landed Costs app is configured.
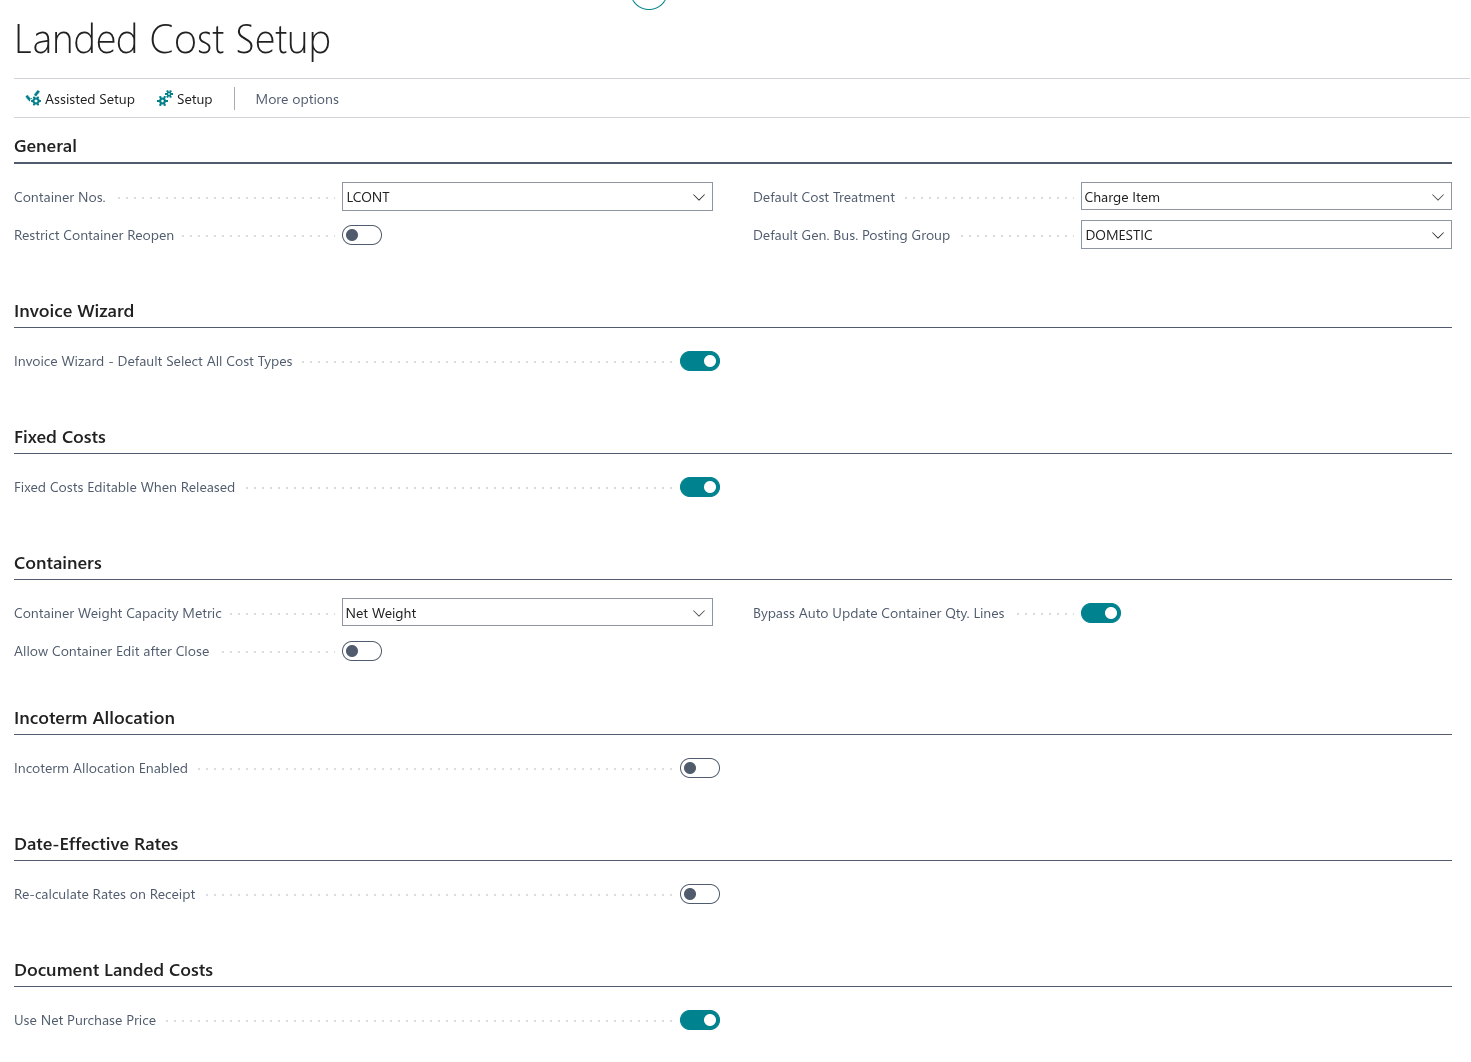
If you are setting up the app for the first time, you can select Assisted Setup from the menu ribbon. A wizard then takes you through the main settings one step at a time. See Assisted Setup.
The following fields are available on the "Landed Cost Setup" screen.
General
| Container Nos. | Defines the No. Series used to number new "Landed Cost Containers". Set this field if you want the Container No. to be assigned automatically. If you assign Container numbers by hand, you do not need to fill it in. |
| Restrict Container Reopen | Stops you from changing the Status of a Landed Cost Container from Released back to Open once a Warehouse Receipt has been created for the Container. |
| Default Cost Treatment |
The Cost Treatment given to new Landed Cost Types. The options are Default and Charge Item, and the field is set to Default when the app is installed. Default posts costs using Overhead Rate cost posting, with landed cost variances posted to the General Ledger. This was how Clever Landed Costs worked before version 5.0.0. Charge Item sets up the Landed Cost Type to post Expected and Actual Cost directly into Inventory using Value Entries, so that variances are also applied to Inventory. |
| Default Gen. Bus. Posting Group | The Gen. Bus. Posting Group given to new Landed Cost Types that use the Charge Item Cost Treatment. It is not used for the Default Cost Treatment. When expected and actual landed costs are posted, it is combined with the Gen. Prod. Posting Group of the relevant Item Charge to find the correct accounts in the "General Posting Setup" and "Inventory Posting Setup" screens. |
Invoice Wizard
| Invoice Wizard - Default Select All Cost Types | Specifies whether all Landed Cost Types are selected by default when you use the Landed Cost Invoice Wizard on a Purchase Invoice. This field is enabled when the app is installed. See Purchase Invoice Wizard. |
Fixed Costs
| Fixed Costs Editable When Released | Specifies whether you can edit Fixed Costs after a "Purchase Order", "Transfer Order" or "Landed Cost Container" has been Released. When this field is disabled (the default), Fixed Costs are read-only once the document or Container is released. |
Containers
| Container Weight Capacity Metric | Specifies which weight is used to calculate the Assigned Weight on a Landed Cost Container. Select Net Weight (the default) to use the net weight of the purchase line, or Gross Weight to include packaging weight. |
| Allow Container Edit after Close | When enabled, you can update the informational fields on a closed Landed Cost Container (such as Seal No., Job No. and port information) without having to reverse any postings. When disabled, the Container is fully read-only once its Status is Closed. |
| Bypass Auto Update Container Qty. Lines |
When enabled, changing the Landed Cost Container Qty. on a Container line does not immediately prompt you to reduce the Purchase Line quantity or move the balance to a new line. You can update as many lines as you need, then process all the outstanding changes at once using the Validate Landed Cost Container Qty. action on the "Landed Cost Container Detail" screen. When disabled (the default), you are prompted to confirm each line change straight away. |
Incoterm Allocation
| Incoterm Allocation Enabled |
Specifies whether Document Landed Costs are allocated based on the Shipment Method Code (Incoterm) on the document. When enabled, the "Landed Costs Incoterms" matrix decides whether each Landed Cost Type is applied to the "Purchase Order" or to the "Transfer Order". See Incoterm Allocation. Enabling this field also shows the Transfer Variance Account field on the "Landed Cost Types" screen. |
When you enable Incoterm Allocation Enabled, you are asked whether you want to initialise the Shipment Method Matrix with default values. If you answer yes, choose the default allocation from the following options.
-
Not Applied - Landed Costs are not calculated for the combination
-
Purchase - Landed Costs are calculated on the Purchase Order
-
Transfer - Landed Costs are calculated on the Transfer Order
The option you choose is applied to every combination of Landed Cost Type and Shipment Method, including the blank Shipment Method. This overwrites any values already in the matrix. The "Landed Costs Incoterms" screen then opens so that you can review and adjust each combination.
Note: if you answer no, the field is still enabled, but the matrix is not filled in. You can set it up later by selecting Landed Cost Incoterms from the Setup menu.
Date-Effective Rates
| Re-calculate Rates on Receipt |
Specifies whether landed cost rates are recalculated when a receipt is posted. When enabled, the Posting Date of the receipt is used to find the rate that applies, instead of the expected receipt date used when the Document Landed Costs were first created. This applies to receipts from both Purchase Orders and Transfer Orders. Only lines with a Qty. to Receive are recalculated. If you removed a Landed Cost Type from a line before posting, it is not added back. On Purchase Orders, any Landed Cost Vendor No. you changed on a line is kept. |
Document Landed Costs
| Use Net Purchase Price |
Specifies whether Document Landed Costs for the Percent and Duty Calculation Types are calculated from the net purchase price instead of the gross Direct Unit Cost. When enabled, the base cost is the purchase line Amount (after any Line Discount and Invoice Discount) divided by the Quantity. This means the calculation reflects the cost you actually pay when you use discounts on Purchase Orders. Items that use Standard Cost, and Stockkeeping Units with a Base Cost override, are not affected by this setting. |
Setup Menu
To make the other Clever Landed Costs setup screens easy to find, they are grouped under the Setup menu on the "Landed Cost Setup" screen, as shown below.

-
Landed Cost Types - set up the types of cost you want to capture. See Landed Cost Types
-
Landed Cost Journal Templates - set up the templates for the "Landed Cost Journal". See Landed Cost Journal
-
Landed Cost Vehicles - set up the vehicles used to move goods. See Landed Cost Vehicles
-
Landed Cost Categories - set up categories to group Landed Cost Types for reporting. See Landed Cost Categories
-
Landed Cost Container Types - set up the types of Container you use
-
Landed Cost Containers - open the list of Landed Cost Containers. See Landed Cost Containers
-
Ports - define the ports your business trades through, with a Code and Description. You can assign them to Landed Cost Containers to record the Port of Loading, Port of Discharge, Port of Receipt and Port of Delivery for each shipment
-
Landed Cost Incoterms - open the "Landed Costs Incoterms" matrix, where you choose which Landed Cost Types apply to Purchase Orders and Transfer Orders for each Shipment Method
Note: if you upgraded from an earlier version of Clever Landed Costs, the "Ports" screen was filled in automatically from your existing Entry/Exit Points.
The following sections of this user guide explain each of these setup areas in more detail.