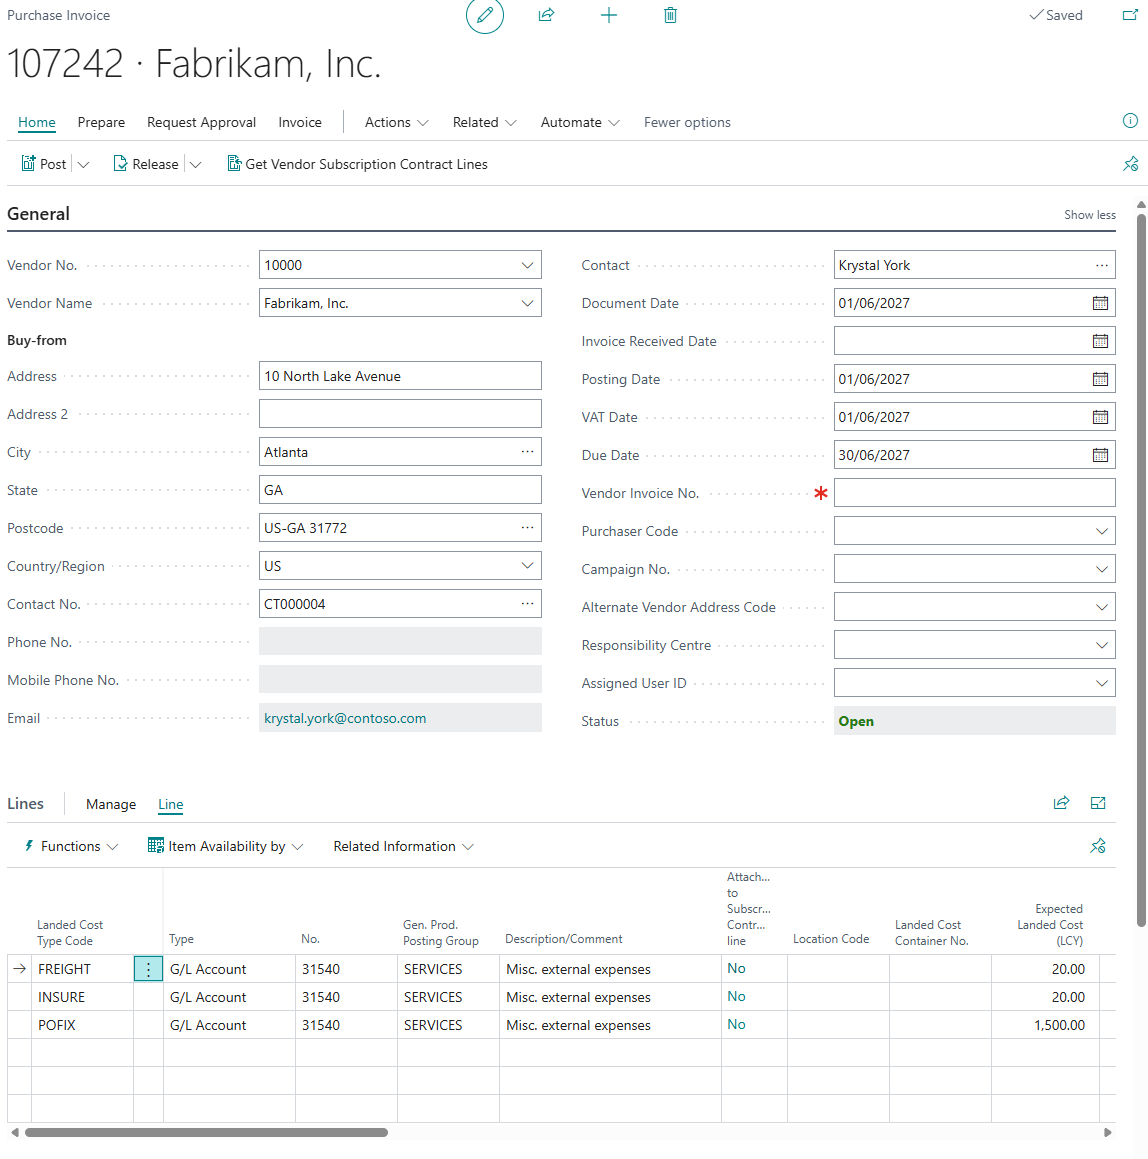
The Create Landed Cost Invoice wizard has been created to allow for easier matching of costs to Purchase Orders and Transfer Orders, and automation of Invoice Line creation. After creating a new "Purchase Invoice" for your Landed Cost Vendor, the Create Landed Cost Invoice function can be used, which is available from the Functions menu of the Lines section on the "Purchase Invoice" document, as shown below.
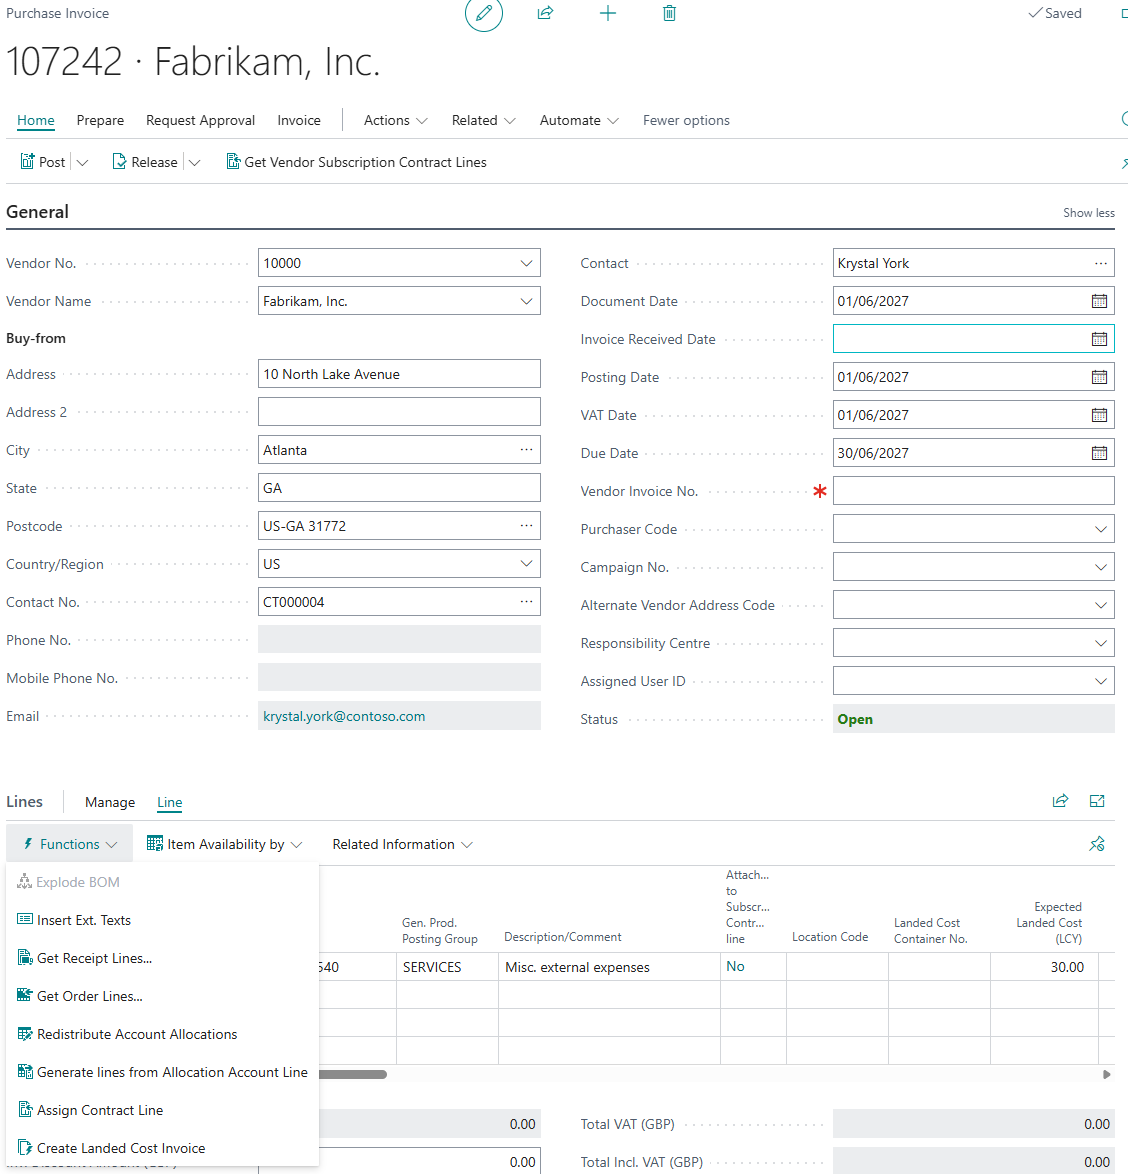
The wizard has three steps, which you move between using Back and Next. Nothing is added to the Invoice until you press Finish on the last step.
Step 1 - Select Source Documents
When selected the wizard will start and the "Create Landed Cost Invoice" screen will be displayed, presenting a list of Purchase and Transfer Orders which have had Expected Landed Costs recorded against them during receipt transactions. The list is based on the open "LC Ledger Entries" that have not yet been invoiced. Fixed costs posted against a Landed Cost Container are included against the Purchase Order they were received on.
A Source Document is shown on one line for each combination of Container No. and Job No. it was received with, so a Purchase Order received on two containers is shown on two lines. Entries that are already assigned on this or any other Purchase Invoice that has not been posted yet are left out, and a line is not shown at all if all of its entries are already assigned.
If you wish to see more information on a larger screen, press the Expand icon in the top right corner of the screen, which will then provide a view as below.
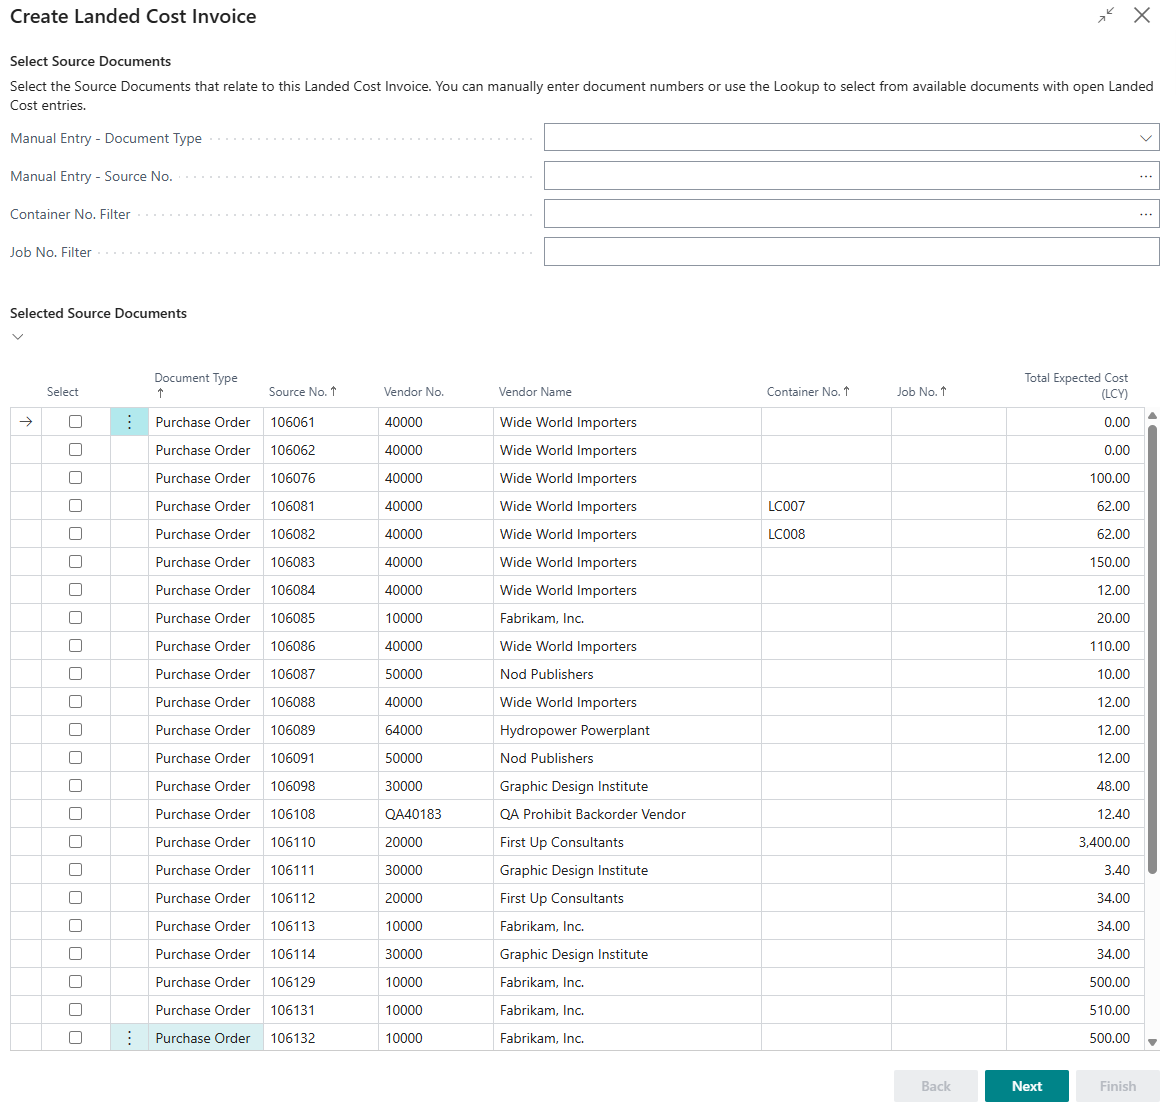
Simply select the Purchase Orders and Transfer Orders that you are processing against the Invoice. You can do this in any of the following ways, and you can combine them as needed:
-
press the Select check box against the relevant Documents on screen
-
enter the Source Document No. manually in the Manual Entry - Source No. field
-
use the lookup on the Manual Entry - Source No. field to open the "Select Source Documents" list, highlight one or more lines and press OK
-
use the Container No. Filter or Job No. Filter fields to select every line for a shipment
The following fields are available at the top of the screen.
| Manual Entry - Document Type | Choose Purchase Order or Transfer Order to filter the list below, and the lookup, to that type of document. Leave it blank (the default) to show both. This also sets the type of document you enter in Manual Entry - Source No. |
| Manual Entry - Source No. | Enter a Source Document number to select all of its lines. When Manual Entry - Document Type is blank the number is detected automatically: it is treated as a Purchase Order if one matches, otherwise as a Transfer Order. Set Manual Entry - Document Type to Purchase Order or Transfer Order if you want to restrict the number to that type. When you enter a Purchase Order, any Transfer Orders created from it (where the Purchase Order No. on the "Transfer Order" is that Purchase Order) are selected too. The field is cleared once the document has been added. |
| Container No. Filter | Enter a Container Number or use the lookup to browse the list of "Landed Cost Containers". The system will automatically select all Source Document lines that have open Landed Cost Ledger Entries linked to that Container. This is particularly useful when processing invoices that span multiple Purchase Orders from the same shipment. |
| Job No. Filter | Enter a Job Number to automatically select all Source Document lines that have open Landed Cost Ledger Entries associated with that Job, allowing you to quickly bring together all documents relating to a particular procurement or shipment job for invoicing. |
Note: the Container No. and Job No. filters add to your selection rather than replacing it, so lines you have already selected stay selected. Once the matching lines have been selected, the filter field is cleared so that you can enter another value.
Note: if you enter a Source Document that does not have any open Landed Cost entries, the message Source Document [No.] does not have any open Landed Cost entries is shown. Entering a Source Document that is already selected simply leaves it selected, so a document cannot be added twice.
The following fields are shown for each line in the Selected Source Documents list (and in the "Select Source Documents" lookup).
| Select | Tick this to include the line on the Landed Cost Invoice. |
| Document Type | The type of Source Document, Purchase Order or Transfer Order. |
| Source No. | The Source Document number. |
| Vendor No. | The Vendor of the Purchase Order. This is blank for Transfer Orders. |
| Vendor Name | The name of the Vendor. |
| Container No. | The Landed Cost Container No. for this group of entries. |
| Job No. | The Landed Cost Job No. for this group of entries. |
| Total Expected Cost (LCY) | The total expected Landed Cost (LCY) for this group of entries that is still available to invoice. |
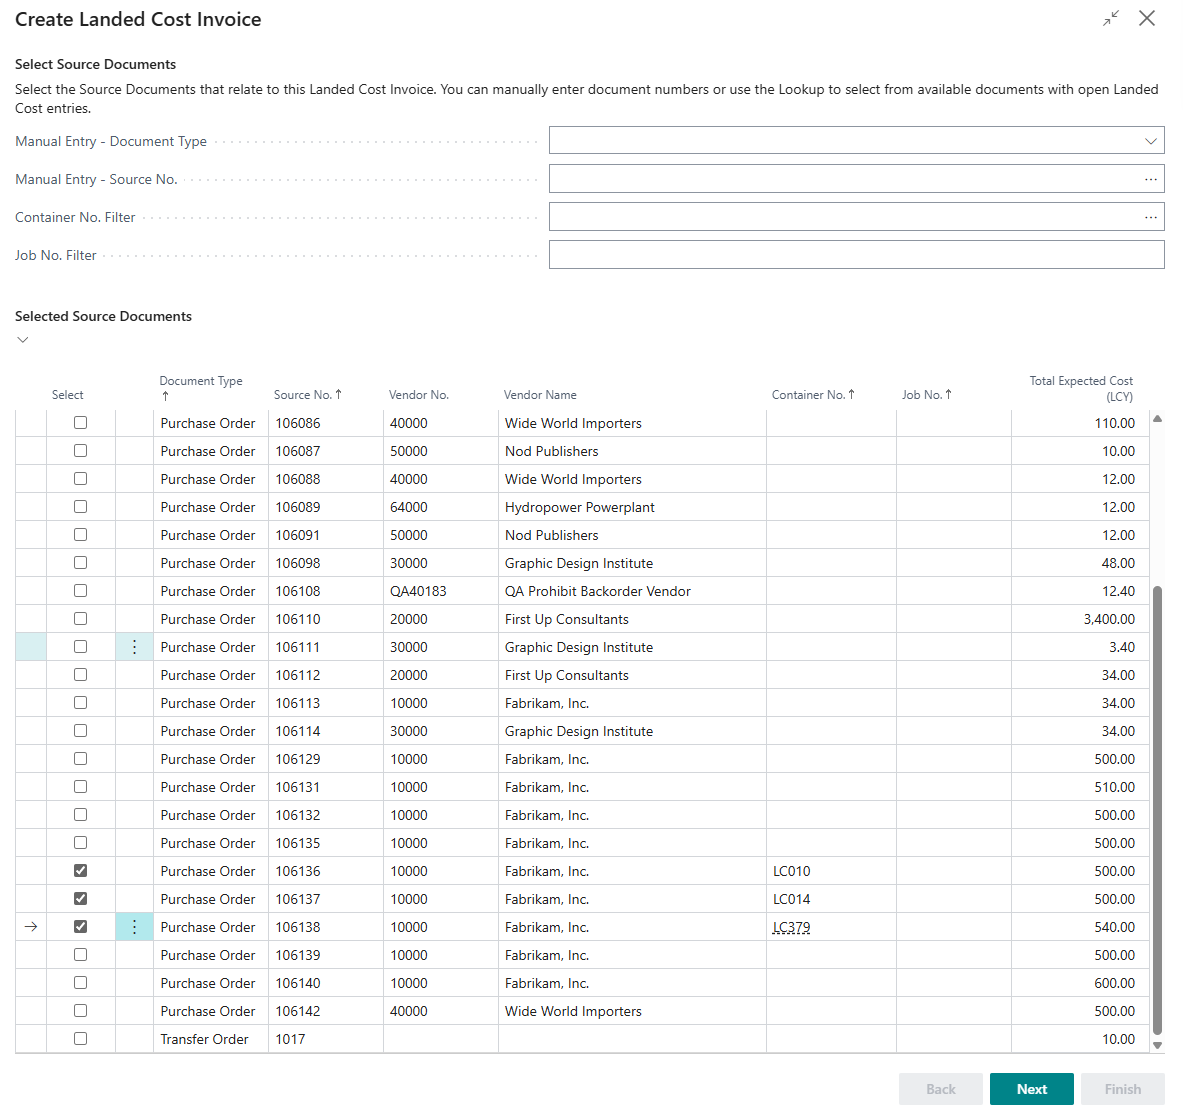
Press Next to continue. If no lines are selected, the message Please select at least one Source Document is shown.
Step 2 - Select Landed Cost Types
On the next screen you will see the list of Available Landed Cost Types that are applicable to the Purchase and/or Transfer Order(s) selected previously. Only cost types with open entries for the selected Source Documents, that are not already assigned on an unposted Purchase Invoice, are shown.
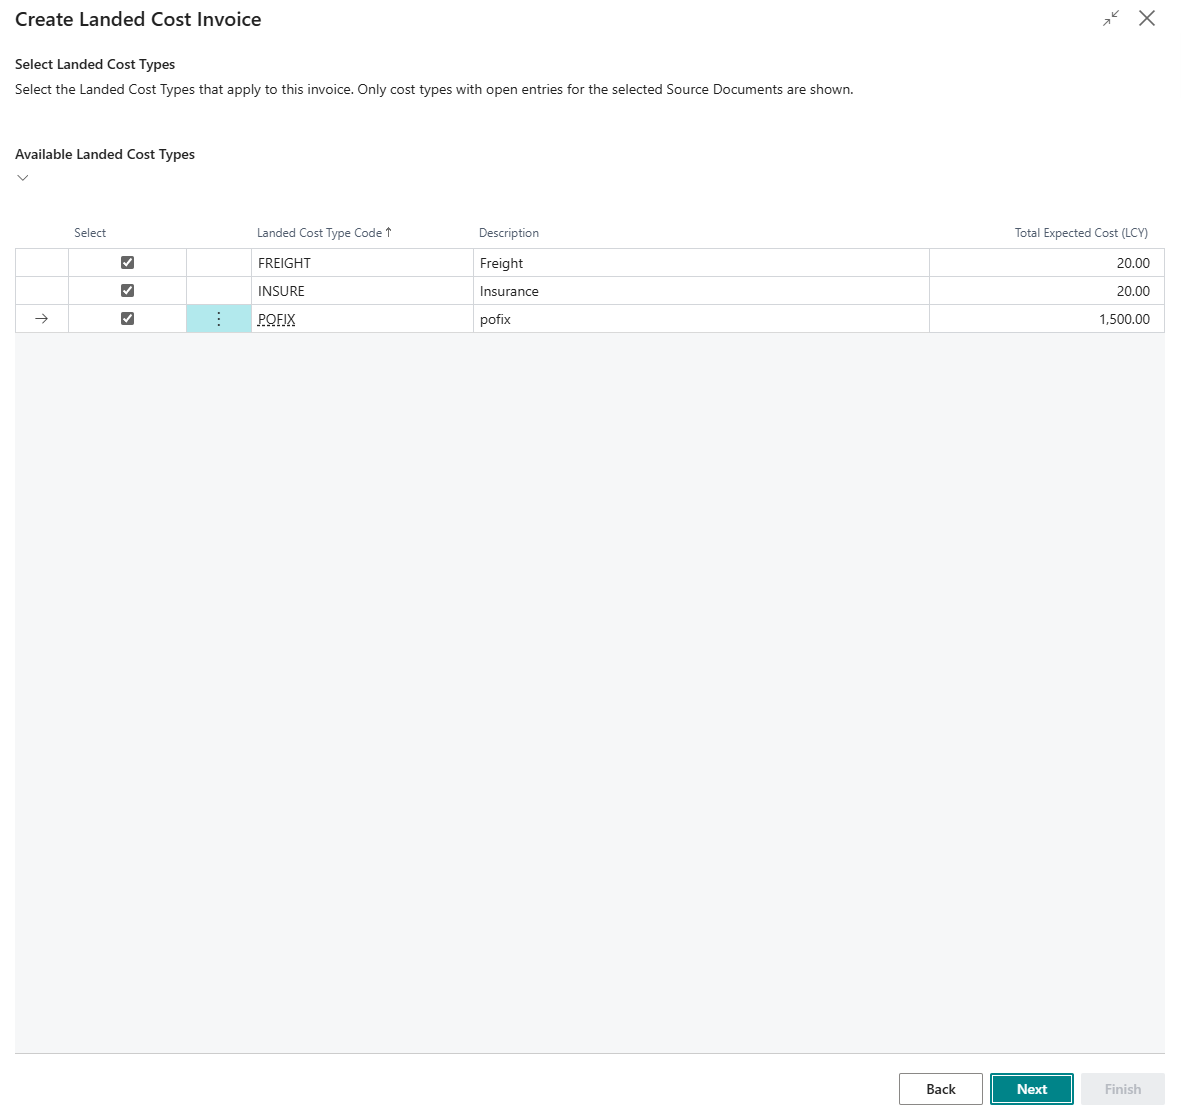
| Select | Tick this for each Landed Cost Type that you are applying the Invoice against. One Invoice line is created for each selected Landed Cost Type. |
| Landed Cost Type Code | The Landed Cost Type code. |
| Description | The description of the Landed Cost Type. |
| Total Expected Cost (LCY) | The total expected Landed Cost (LCY) for this cost type across the selected Source Documents. |
Referring to the Landed Cost Setup, you are able to control whether all Cost Types are selected automatically by activating the Invoice Wizard - Default Select All Cost Types field. This field is switched on by default.
Press Next to continue. If no Landed Cost Types are selected, the message Please select at least one Landed Cost Type is shown.
Step 3 - Preview Invoice Lines
You will now see a Preview of the Lines that will be created on the "Purchase Invoice".
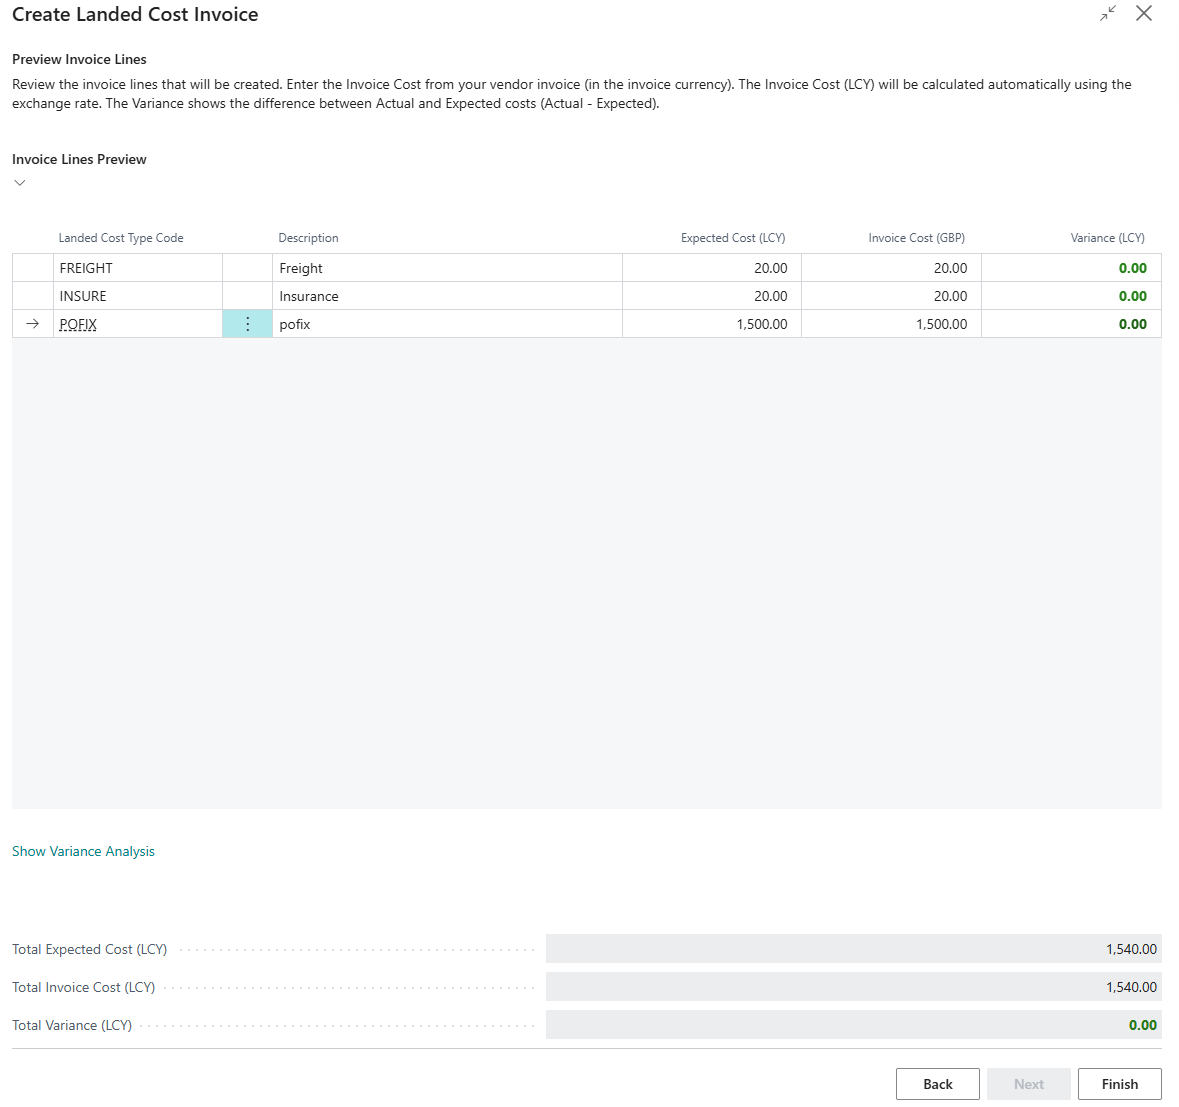
On the above screen, the system will default the Invoice Cost to match the Expected Cost that has been accrued for the selected Source Documents, for each Landed Cost Type. You can then change the Invoice Cost field to match your Vendor's Invoice. If your Invoice is in FCY, then the suggested Invoice Cost will be converted using the Exchange Rate on your "Purchase Invoice" for variance calculations, which will be shown to you immediately.
| Landed Cost Type Code | The Landed Cost Type code for this Invoice line. |
| Description | The description of the Landed Cost Type. |
| Expected Cost (LCY) | The total expected cost (LCY) for this cost type across the selected Source Documents. |
| Invoice Cost | Enter the invoice cost amount from the Vendor's Invoice, in the currency of the "Purchase Invoice". The column caption shows the currency code, for example Invoice Cost (USD), or your local currency code when the Invoice is in LCY. |
| Invoice Cost (LCY) | The Invoice Cost converted to LCY using the exchange rate of the "Purchase Invoice". This column is only shown when the Invoice is in a foreign currency. |
| Variance (LCY) | The difference between the Invoice Cost (LCY) and the Expected Cost (LCY). |
Below the lines, the Total Expected Cost (LCY), Total Invoice Cost (LCY) and Total Variance (LCY) are shown for all of the lines.
Variances are shown in Red if the actual cost is higher than the Expected Cost and Green if the cost is lower (or equal to) the Expected Cost.
Variance Analysis
Also referring to the above screenshot, you can select a line and press the Show Variance Analysis link to see how the cost will be applied, and you are able to adjust the apportionment if required. This opens the "Variance Analysis" screen, which lists each receipt entry that the line will be assigned to.
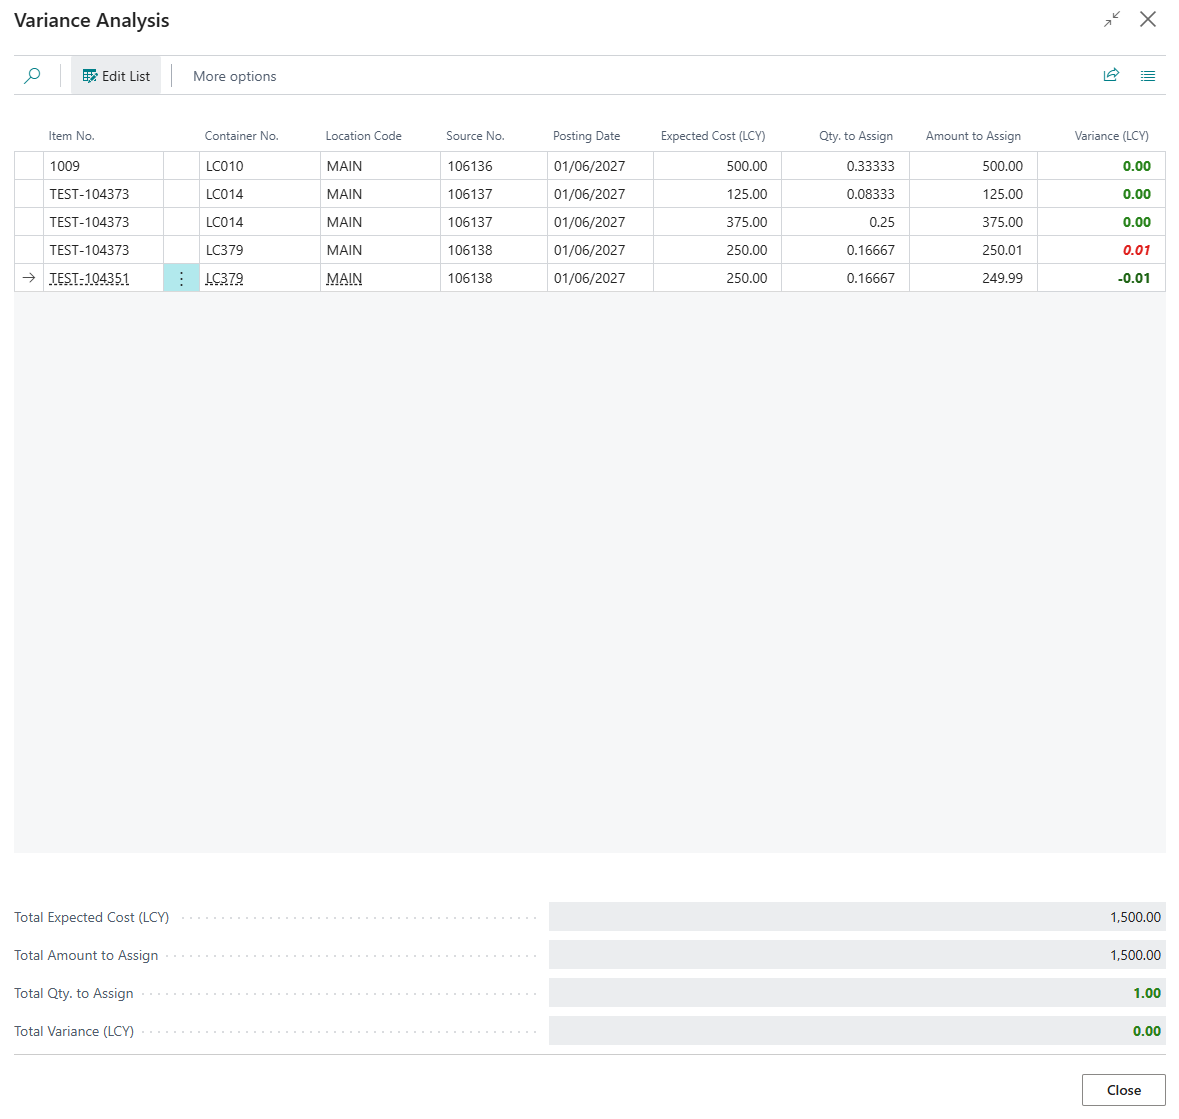
| Item No. | The Item associated with this accrual entry. |
| Container No. | The Container associated with this accrual entry. |
| Location Code | The Location associated with this accrual entry. |
| Source No. | The Purchase Order or Transfer Order number for this accrual entry. |
| Posting Date | The posting date of the accrual entry. |
| Expected Cost (LCY) | The expected (accrued) cost for this entry. |
| Qty. to Assign | The proportion of the Invoice line cost to assign to this entry. This defaults to each entry's share of the total Expected Cost (or an equal share if there is no Expected Cost) and can be changed. All values must add up to 1. |
| Amount to Assign | The amount of the Invoice line cost (LCY) assigned to this entry, calculated from the Qty. to Assign. |
| Variance (LCY) | The difference between the Amount to Assign and the Expected Cost for this entry. This is shown in red when the Amount to Assign is higher than the Expected Cost. |
Below the lines, the Total Expected Cost (LCY), Total Amount to Assign, Total Qty. to Assign and Total Variance (LCY) are shown. The Total Qty. to Assign is shown in red until it equals 1, and the Total Variance (LCY) is shown in red whenever it is not zero.
Select Reset to Default to set the Qty. to Assign values back to the proportional split based on the Expected Cost. Press OK to keep your changes, or Cancel to discard them.
Note: you cannot close the "Variance Analysis" screen with OK until the Total Qty. to Assign equals 1. If you change the Invoice Cost after using the "Variance Analysis" screen, the amounts are recalculated using the Qty. to Assign values you entered.
Finishing the Wizard
When you are happy to proceed, press Finish and the system will create the Invoice Lines with all of the assignment to the Purchase Receipt Item Ledger Entries. A message confirms how many lines were added.
For each Landed Cost Type, one line is added after any existing lines on the "Purchase Invoice". The line has the Landed Cost Type Code, a Quantity of 1 and the Invoice Cost as the Direct Unit Cost Excl. VAT. The Landed Cost assignments for the line use the Qty. to Assign values from the "Variance Analysis" screen if you changed them, or the proportional split based on the Expected Cost if you did not. You can review them at any time using Line > Related Information > Landed Cost Assignment, as described in Invoicing Landed Costs.
On the "Purchase Invoice" document (on the Lines section) the Expected Landed Cost (LCY) and Landed Cost Variance (LCY) fields show the Variance information for each Invoice Line.
Landed Cost information is also shown on the Totals section of the "Purchase Invoice", where the Expected Landed Cost (LCY) and Landed Cost Variance (LCY) totals are shown for all Landed Cost lines.